
VMPRO Windows to Windows Network Share for Recording Library
Summary
This article covers the steps to add Administrator permissions to the Chronicall Recording Library service so it doesn't have issues pulling from the VRL network share folder on the VMPRO server.
AlertXima technicians do not set up the network share for the VRL folder. You'll need to contact your Network Administrator to share the VRL folder over the network so the Chronicall Recording Library server can see it and pull files from it.
- A good way to verify the folder is shared is to see if you can hit the VRL network path from the Recording Library server via File Explorer.
NoteThe monitored directory needs to be set to the full file path of the shared folder.
For example: if the folder
\\xx.xx.xx.xx\VRLis shared to the network as theZ:\drive, the monitored directory still needs to be set to\\10.10.10.10\c$\Program Files (x86)\Avaya\IP Office\Voicemail Pro\VM\VRLin order to actually be accessed. Setting it to anything else, such asZ:\or\\xx.xx.xx.xx\VRL, will cause the Recording Library to show a red error on the home screen bell and fail to run.
You'll want to ensure the VRL folder on the VMPRO server has appropriate permissions for all your users, so the Recording Library service can properly read and edit the .wav files in the VRL on the VMPRO server, as covered below.
Steps to Add Credentials to the Recording Library Service
-
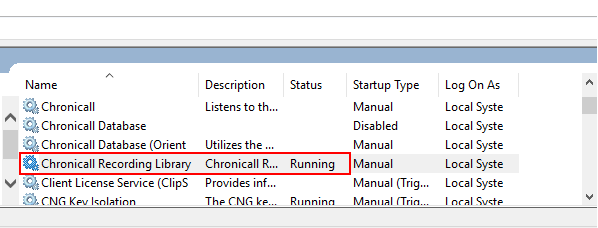
Find the Chronicall Recording Library service in Windows Services.
-
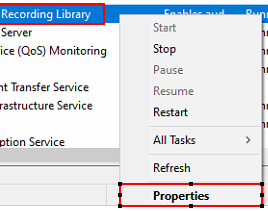
Right-click on it and select Properties.
-
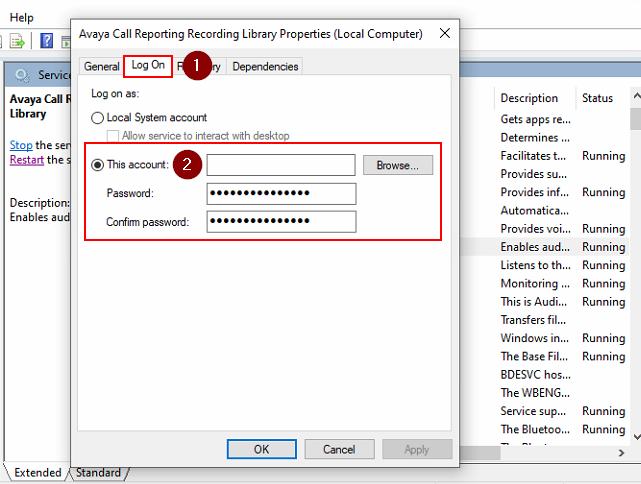
Select the Log On tab, then select This Account.
-
Have your Administrator enter their admin credentials and password so the Chronicall Recording Library service has full access to the network share it needs to reach out to and pull from and/or modify.
How to Add Permissions to the VRL Folder
-
Navigate to the VRL folder on your Windows VMPRO server — this is where VMPRO is currently storing the .wav audio recordings:
Program Files (x86)/Avaya/vmproProgram Files/Avaya/vmpro
-
Right-click on the VRL folder and select Properties.

-
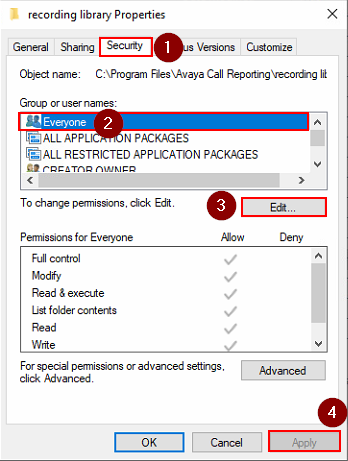
Edit the permissions for Everyone so the Chronicall Recording Library service is able to access and edit the recordings:
-
Click the Security tab.
-
Select Everyone from the list of groups or user names.
-
Select Edit, and apply full permissions to these users.
-
Select Apply.
-
-
Go back to the Chronicall Recording Library server and restart the Chronicall Recording Library service.
-
Navigate to the Limbo folder on the Chronicall Recording Library server to confirm audio recordings are being pulled over, assuming the VRL has .wav files to process. You should see files start to populate if there are recordings to pull:
Windows (C:)/Program Files/Chronicall/recording library/limbo
Updated 3 months ago