Schedule Report - HTML Version
This provides instructions on how to schedule a report automatically so that you don't have to go into settings every time and run the report manually.
Reports can be scheduled to run automatically by hour, day, week, and month. Once a report is scheduled, they can be sent directly to your email for you to view.
Before a scheduled report can be sent to your email(s), you will need to make sure that your SMTP settings are properly configured. To learn how to configure your SMTP settings, click here.
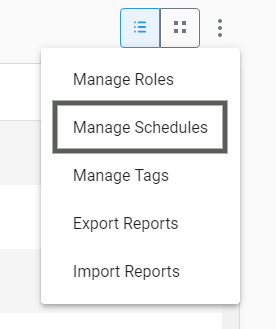
To schedule a report, click the vertical three dots in the top right-hand corner of the My Reports page and click “Manage Schedules.”

The Scheduling Report window will appear. You’ll click “Add Schedule,” which is located in the bottom right-hand corner of the window, and then you’ll fill out the information prompts on the screen.
Window One
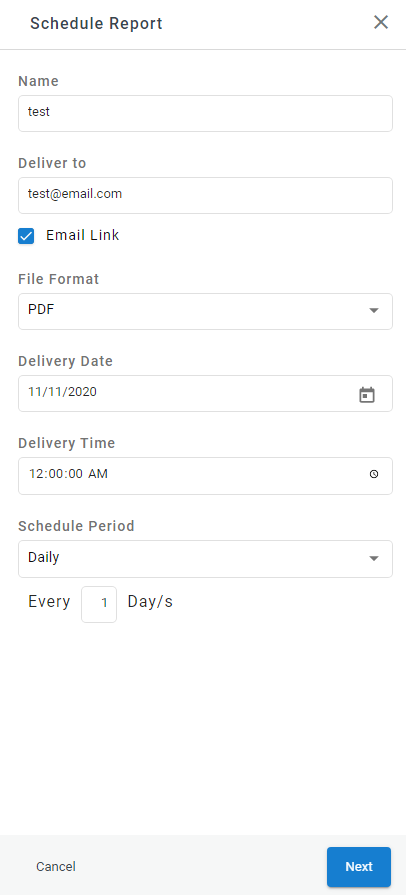
- Name the report schedule.
- Enter in the emails that this schedule should be sent to. Separate each email with a comma.
- Select whether or not you would like an email link.
- Select your file format preference (PDF, XLS, HTML, CSV, JSON).
- Select when you would like your report to be delivered.
- Select what time you would like your report to be delivered.
- Select the frequency period you would like your report to be sent.
- Hourly: Select to run the report hourly throughout the day.
- Daily: Select to run the report daily, every other day, every third day, etc.
- Day of Week: Select to run the report only on specific days.
- Weekly: Select to run the report every week, every other week, etc.
- Monthly: Select to run the report every month, or by specific months. (You can run the report by date, or by day of the week; e.g., run it every first Sunday of the month.)
Chronicall is intuitive. Once a time frame has been selected and the report is scheduled, it will continue to follow that same pattern. For example, if you’ve set up a weekly report, the report will continue to follow the pattern of reporting on the first day of the week to the last day of the week, respectively.
Here is an image example of how this window could be filled out.

Window Two
This window will give you the option to select which report(s) you would like to be included in this specific report schedule.
Window Three
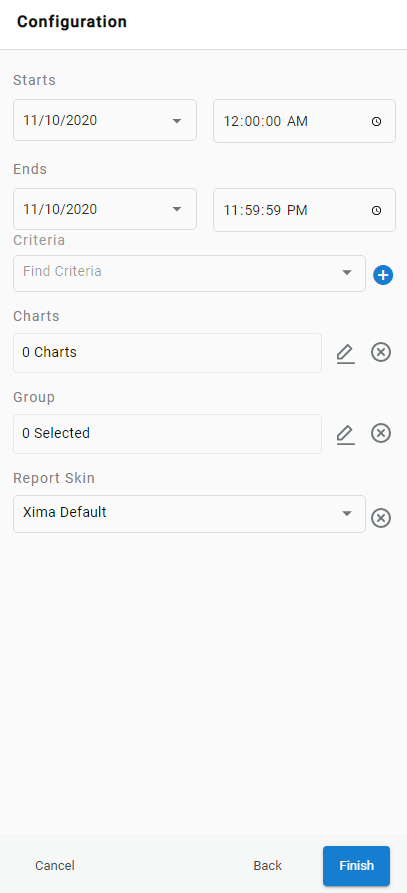
This window will allow you to enter your configuration settings. It will prompt you to fill out the time frame you would like to monitor for each report, and will also prompt you to set up other report information including which agents or groups you want the report to cover.
Report Settings
Starts: Here, you’ll fill out the date and time you would like the report to start.
Ends: Here, you’ll fill out the date and time you would like the report to end.
Example: If you want to set up a monthly report, select the month you would like the report to start running. For this example, we’ll say we entered our start date as June 1st and our end date as June 30th. Because Chronicall is intuitive, once a timeframe has been selected and the report is scheduled, it will continue to follow that same pattern. This means that on July 1st you will get a report covering June 1st through June 30th. The Scheduler will then move to August 1st, and on August 1st, you will get a report covering July 1st through July 31st. As a monthly report, it will report from the first day of the month to the last day of the month. The same rule applies for weekly reports (i.e., the report will continue to follow the pattern of reporting on the first day of the week to the last day of the week, respectively.).
Once you’ve selected your time frame, you’ll move on to the other report settings. Here you will be able to select criteria related to the report such as agents, charts, and more. You will also be able to select which report skin you would like your report to have.
Here is an image example of how this window could be filled out.

Click “Finish" and the report will automatically add to your Schedule Report window. You can always click the report to go back in and edit any existing information.
Updated 3 months ago