
Cisco UCM Troubleshooting Recordings
Overview
This article covers troubleshooting steps to resolve Cisco UCM recording issues.
Cause
Potential causes:
- Invalid Recording Rules
- Chronicall Not Logging
- Chronicall Recording Library Setup
- Recording Library IP Address
- Supported Cisco Phones
- Unassociated Recordings in Cradle to Grave
- Recording Library Out of Ports
- Cisco Recording Profile Setup
- Recording Profile Extension Conflict
Resolution
Follow the troubleshooting flow below to diagnose the issue.
Recording Rules
- First, make sure your users are set up to be recorded via the internal recording rules for VRTX.
- Use this linked article to verify your current recording rules, or create a new recording rule.
Logging Status
-
Verify the overall status of Chronicall and the Recording Library.
-
On the Chronicall Home Screen, left-click the bell in the top right corner as shown below.

-
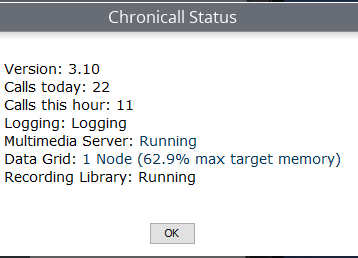
Verify your Chronicall status here.
-
The bell may indicate that there's an issue with a specific Recording Library.
-
If everything is working, it should look similar to the screen below with no errors.
-
If not, you'll see any Recording Libraries with an issue below the Recording Library status.
-
Verify Recording Settings
-
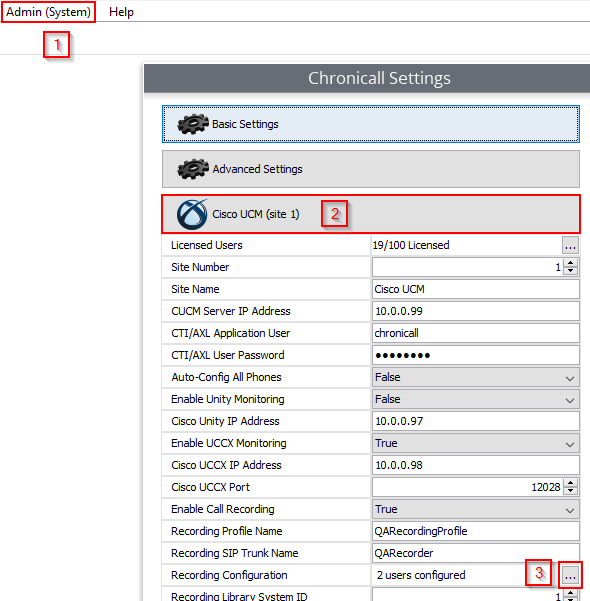
Navigate to Admin (System) > System Settings > Cisco UCM > Recording Configuration > (...).
-
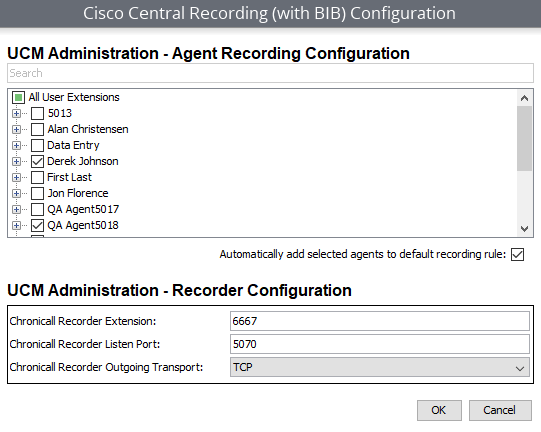
Verify the users you want to be recorded are check-marked as shown below.
-
Make sure you have the correct Recorder Extension configured for Chronicall.
-
Verify no other device is using that extension to prevent conflicts.
-
If you're not sure what your Recorder Extension is, refer to the Recording Profile section below.
-
Disable Firewall
- Chronicall's Recording Library needs unrestricted access to the local network.
- Try disabling the firewall and making another test call that should be recorded.
- This is a common solution if you see audio recordings with a 0:00 length/0 KB size in the Live or Limbo folder.
Verify IP Address
-
Verify that we have the correct IP address for the Chronicall Recording Library to communicate with.
-
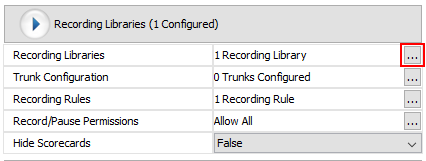
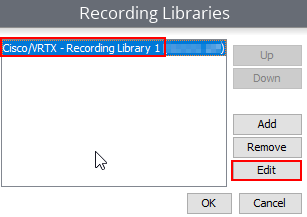
Navigate to Admin (System) > System Settings > Recording Libraries > (...).
-
Select the Recording Library with issues, then Edit.
-
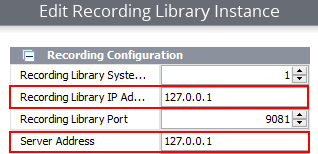
Verify the IP addresses displayed here do not show 127.0.0.1 (Local Host IP) as shown below, even if they're on the local machine.
-
We recommend you use the actual IP address here for both the Chronicall Recording Library server and the Chronicall server.
Supported Cisco Phones
- Refer to this list from Cisco for a list of devices that support call recording.
Check Cradle to Grave
-
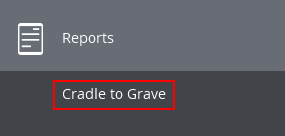
To help identify what issue is affecting your audio recordings, go to Reporting > Cradle to Grave.
-
Select the previous business day for your date, and hit Execute.
- This will display all the calls in Chronicall's database for yesterday.
-
Cradle to Grave will show you if you're getting all recordings, some recordings, or no recordings.
- It will also show if you're getting all calls or missing some, which will affect recordings associating.
-
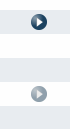
If you see a grayed-out recording icon, that means the call met a recording rule but didn't capture.
-
In the screen below, you can see a call with a blue/white play icon that was captured.
-
Below that is a gray icon, indicating the call met a recording rule but did not capture.
- Keep in mind calls with less than a 10-second talking event will not capture, due to being too short.
- It can also be helpful to filter Cradle to Grave based on inbound and outbound calls, involved with agents that should be recorded.
Unassociated Recordings
- Make sure you're enabled to see unassociated recordings in Cradle to Grave and are searching for the previous day.
- It normally takes around 4 hours for unassociated recordings to show in Cradle to Grave, per our default Recording Library settings.
- Refer to this article to display unassociated recordings inside Cradle to Grave, to verify you can see these after the 4-hour period.
- Bear in mind that Chronicall and the Recording Library are two separate processes.
- Chronicall will log the call data, while the Recording Library records the call.
- Once the Recording Library has finished recording a call, it will use the recording's metadata to associate with a call record in the database.
- If it can't find a call to associate with, and "Keep Unassociated" is set to True within the Recording Configuration, the recording will be listed separately as a "Call Recorded."
- You'll usually see the recording listed right above or below the call with the grayed-out play icon.
- The most common reason for this is a time difference between the audio recording and the time of the call in the database.
Out of Ports
- Make sure there isn't an Out Of Ports folder in the Recording Library directory, at the file paths below:
C:\Program Files (x86)\Xima Software\Chronicall\recording libraryC:\Program Files\Chronicall\recording library/var/lib/Xima Software/Chronicall/recording library
- If there is, the issue is that you're running out of recording ports, and you'd want to upgrade your license to accommodate the increased amount of calls meeting a recording rule.
- The number of your recording ports corresponds to how many recordings will be stored at any one time.
- For example, if you have 8 recording ports and 10 active calls that meet a recording rule, the last 2 will not show in Cradle to Grave.
Trunk Issues
-
Navigate to Call Detail View.
-
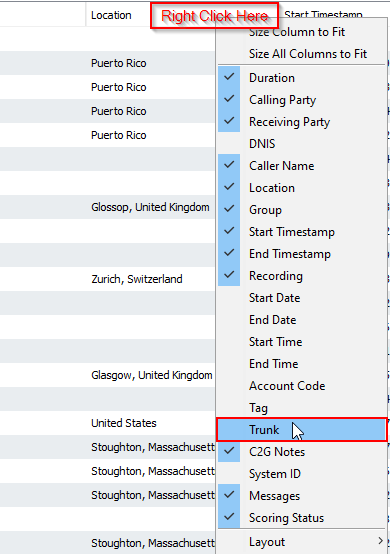
Right-click on the column title bar in Call Detail View, and select Trunk from the drop-down box.
-
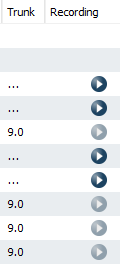
Drag the Recording column next to the Trunk column to diagnose which trunks may be having an issue.
- For example, as shown below, once we displayed Trunks in Call Detail View next to the Recording column, we could see that the calls on Trunk 9 were having issues.
-
This helps identify which device(s) are having an issue.
-
- For example, as shown below, once we displayed Trunks in Call Detail View next to the Recording column, we could see that the calls on Trunk 9 were having issues.
Recording Profile Setup
- A recording profile is necessary for provisioning line appearances to allow recording.
- You should already have a recording profile set up.
Review Recording Library Logs
-
Next, we'll want to enable a special filter to get more details in the Recording Library logs.
-
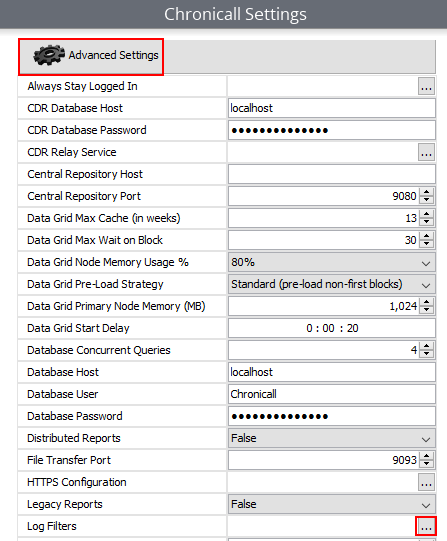
Inside Chronicall, navigate to Admin (System) > System Settings > Advanced Settings > Log Filters (...).
-
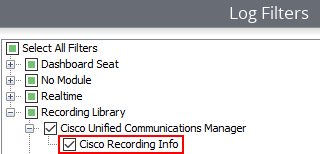
Navigate to Select All Filters > Recording Library > Cisco Unified Communications Manager and verify the option below is checked.
-
Now make some test calls that should be recorded, and refer to the Recording Library and tomcat logs at the file paths below to see if you see any relevant errors.
- Chronicall Recording Library logs:
C:\Program Files (x86)\Xima Software\Chronicall\recording libraryC:\Program Files (x86)\Xima Software\Chronicall\recording library\logsC:\Program Files\Chronicall\recording library\logs/var/lib/Xima Software/Chronicall/recording library/logs
- Chronicall tomcat logs:
C:\Program Files\Chronicall\tomcat\logsC:\Program Files (x86)\Xima Software\Chronicall\tomcat\logs/var/lib/Xima Software/Chronicall/tomcat/logs
- Chronicall Recording Library logs:
Updated 3 months ago