Avaya IP Office - Server Installation
This is a complete server installation guide for Avaya IP Office.
1.0. Chronicall Call Reporting Specs
Format
- Downloadable setup file
Database
- PostgreSQL
Web Server
- Apache Tomcat
User Interface
- Web Interface and Chronicall Desktop Application
Avaya IP Office
- Release 4.0 - 9.1
IP Office Connection
- Release 4.0 - 9.1: System Monitor
- Release 10.0 and newer: Devlink3
Note: Devlink3 requires Avaya CTI Link License
Avaya Licenses Required
- IP Office 10.0 + - CTI Link License
Virtual Machine
- VM Ware
Chronicall Server Requirements
Installation LocationChronicall cannot be installed on the same PC/Server as IP Office Server Edition or the Application Server.
- Windows 8 or higher; Windows Server 2008 or higher; 32/64-bit Linux
- 250 GB or more of available disk space
- 4-8 GB or more of RAM
- Quad-Core CPU (minimum)
Note: The chart below shows the amount of RAM required per Realtime Agent Seat.
Realtime Agent Seats | 1-10 | 10-25 | 26-50 | 51-250 | 250+ Agents |
|---|---|---|---|---|---|
RAM | 4GB | 4GB | 6GB | 8GB | 8GB & 2nd Server for Realtime Node Software |
User PC Requirements
- Windows 7 or higher; 32/64-bit Linux
- Internet Explorer
- Java 7 or above
- Javascript enabled
Recording Storage
The following chart details the number of days until the disk drive is filled up from recording. Use this information to determine your company’s needs.
1 Agent | 5 Agents | 10 Agents | 25 Agents | 50 Agents | |
|---|---|---|---|---|---|
32 GB | 700 | 140 | 70 | 28 | 14 |
250 GB | 5,461 | 1,092 | 546 | 218 | 109 |
500 GB | 10,922 | 2,185 | 1,092 | 437 | 218 |
1000 GB | 21,845 | 4,370 | 2,185 | 875 | 437 |
Assume 8 hours per agent, per day
VRTX CPU & Server Requirements
2.0. Chronicall Standard Installation
SIP Trunk UtilizationIf you are utilizing a SIP trunk, it is recommended (but not required) that a Port Mirror be utilized.
Note: It is recommended that no more than two devices are attached to the Chronicall Server. If more than two VRTX devices are needed, be sure that they are attached to separate, stand-alone servers. Three VRTX devices are supported per server. If encrypting recordings, additional memory may be needed. Refer to the chart below for memory requirements for the amount of VRTX devices and Recording Ports (RP)
CPU & RAM |
|---|
1 VRTX - 10 RP:
|
1 VRTX 11-23 RP:
|
2 VRTX up to 25 RP:
|
2 VRTX up to 46 RP:
|
3 VTRX up to 69 CPU:
|
2.1. Chronicall
SETUP
Follow the steps through this installation guide in order to setup, install, and configure Chronicall and Recording Library.
- Read the End-User Agreement. Select "I accept the agreement" if you agree.
- Select the location where you would like Chronicall to be installed. C: is the default, but you may install it on the network drive of your choice.
- Input the serial key that was provided to you by Xima.
- On the PostgreSQL page, the port, user, and password are given to you by default. You may change the information if desired.
- The Web Server Port information will automatically populate. You may change this information if desired.
INSTALLATION
- Select install.
- Once the install is finished, open Internet Explorer and enter the given web address.
NoteInternet Explorer is currently the only web browser that supports the required Java Plugin.
- Use the default Username and Password. You may change this later under user accounts.
3.0. Recording Library Installation
When installing Recording Library there are two standard choices:
- VRTX
- Voicemail Pro.
Follow the steps under the specific section that matches your network needs.
3.1. Recording Library Setup for VRTX
With networks that have a VRTX, Chronicall will monitor the network traffic on the trunk that the VRTX is recording. Follow the following steps to install Recording Library for VRTX.
SETUP
- Download the VRTX Driver here. You will need to enter your Chronicall Serial Key before you can run the driver.
- Run the installer and follow the installation wizard.
- Go to Device Manager and confirm that VRTX is in the USB section.
INSTALLATION
When installing Recording Library for VRTX you have two choices depending on where you have Chronicall installed:
- If Chronicall and the Recording Library share the same server go to 3.1.a.
- If Chronicall and the Recording Library will not share the same server go to 3.1.b.
3.1.a Chronicall and the Recording Library share the same Server (VRTX)
If Chronicall and the Recording Library share the same server then the Recording Library may have already been installed. Verify or install the Recording Library by doing the following:
- Open your server’s local services and verify that the Chronicall Recording Library exists.
- If it does not exist, download and run the Chronicall Update (not the Recording Library set up).
a. When prompted to install the Recording Library on this machine select “Yes”.
b. Follow the installation and when done repeat Step 3.1.a 1.
NoteIt is not recommended having Chronicall and the recording library share the same server.
3.1.b Chronicall and the Recording Library do not share the same Server (VRTX)
If Chronicall and the Recording Library do not share the same server then the Recording Library requires a separate setup file to be installed on the server where Chronicall is not installed.
Install the Recording Library by doing the following:
- Download the Recording Library Setup or App Installer (for Chronicall 3.95 and above) here. You will need to enter your Chronicall Serial Key.
- Follow the install steps.
a. When prompted to enter the Chronicall IP address enter the server address where Chronicall is installed, not the server where Recording Library will be installed.
3.2 Recording Library Setup and Installation for IP Office
With networks that have Voicemail Pro and Windows there are two options when setting up the Recording Library. Follow the steps under the appropriate section that corresponds best with your network settings.
3.2.a Chronicall and Voicemail Pro share the same Server (Windows)
If Chronicall and the Recording Library share the same server that is hosting Voicemail Pro, then the Recording Library may have been installed. Verify or install the Recording Library by doing the following:
- Open the server’s local services and verify that the Chronicall Recording Library service exists.
- If the Recording Library service does not exist do the following:
a. Download an Chronicall update here. (You will need to enter your Chronicall Serial Key.)
b. Run the Chronicall update.
c. Select “Yes” when prompted to install the Recording Library. - Go to section 4 to configure the Recording Library after you ensure the Recording Library has been installed.
3.2.b Chronicall and Voicemail Pro do not share the same Server (IP Office)*
If Chronicall and the Recording Library do not share the same server that is hosting Voicemail Pro then installing Recording Library requires a separate setup file to be installed on the server with Voicemail Pro. To install the needed separate file follow these steps:
- Download the setup file here (You will need to enter your Chronicall Serial Key.)
- Follow the steps through the installation
- Go to section 4 to configure the Recording Library after you ensure the Recording Library has been installed.
3.3 Recording Library Setup for Voicemail Pro on Linux
With networks that have Voicemail Pro and Linux, there are three options when setting up the Recording Library. Follow the steps under the appropriate section that corresponds best with your network settings.
3.3.a Chronicall and Voicemail Pro share the same Server (Linux)
If Chronicall and the Recording Library share the same server that is hosting Voicemail Pro, then the Recording Library may have been installed. Verify or install the Recording Library by doing the following:
- View the /etc/init.d directory and look for recording_library.
- If it does not exist, download the Apps Installer. You will need to use -chron_docbase with the full URL instead of -chron_port and -chron_ipdownload
a. Download the Apps Installer for Linux here (You will need to enter your Chronicall serial key)
b. Navigate to most recent build of Chronicall and right click on the Apps option of the build that suits your needs. Then select "Copy link address" and paste that copied link onto a notepad.
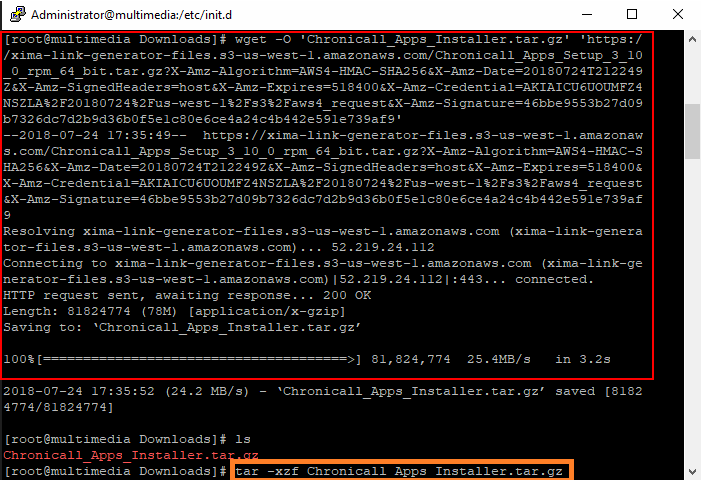
c. After that is complete, navigate to a directory you would like to place the Chronicall installers. This can be a directory tailor-made for this purpose so you can delete the files once the task is done. Once there, type the following command: wget -O '(Name of your choice).tar.gz' 'https://(rest of the link that was copied from Chronicall)' After executing, you should see something like this (boxed in red):

d. Here, we run our next command (boxed in orange above): tar -xzf (Name we specified earlier).tar.gz
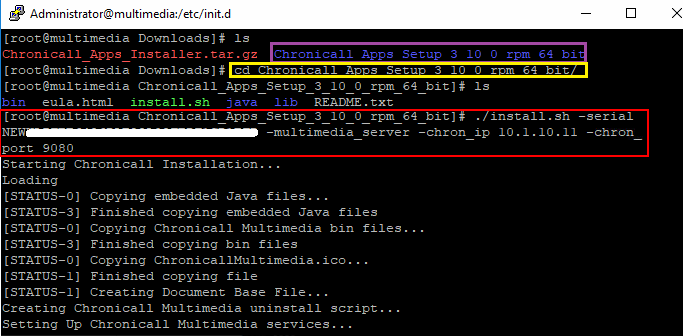
e. After this is done and our files inflated, we can now navigate to the newly created directory hosting our installer (boxed in purple and yellow).

f. Here, we type in the following command (boxed in red above): ./install.sh -Applicable_Service_Name (reference items below) -chron_ip (IP Address of Hosting Chronicall Server) -chron_port (typically 9080)
g. Executing this should be the last and final step.
3.3.b Chronicall and Voicemail Pro do not share the same Server (Linux)*
If Chronicall and the Recording Library do not share the same server that is hosting Voicemail Pro then installing Recording Library requires a separate setup file to be installed on another server that can communicate with the Chronicall server and the Voicemail Pro server. To install the needed separate file follow these steps:
- Download the setup here
- Change to a common directory.
a. Ex. The Administrator home directory: cd/home/Administrator - Download the Recording Library Setup for Linux onto the Linux server.
a. Right click the Recording Library download and select Copy Link Address.
b. Enter: wget -0 recording_library.zip “Enter download link from step a here” - Unzip the downloaded file: unzip ipoffice_chronicall_update_3_6_50.zip
- Run a command to change update.sh into an executable file: chmod +x update.sh
- Launch update.sh: ./update.sh
4.0. Recording Library Configuration
When installing Recording Library there are three standard choices: VRTX, Voicemail Pro for IP Office Windows, and Voicemail Pro for IP Office Linux. Follow the steps under the specific section that matches your network needs.
4.1. VRTX Recording Library Configuration
SETUP
- Open Chronicall once you have installed Recording Library
- Go to System Settings -> Recording Library
- Click on the ellipsis next to “Recording Libraries”
- Click “Add”
- Select the Recording Library Type
a. Xima VRTX only
b. Xima VRTX or Voicemail Pro
SETTINGS CONFIGURATION
Edit the following fields:
- Recording Library IP Address: Enter the IP address of the server where the Recording Library was installed.
- Chronicall Server Address:
Enter the Chronicall Server IP address. - Recording Storage Location: Configure where the recordings will be stored. The default will be the recording Library directory. You will also be able to manage your retention policies here.
Configuration of SFTP for Windows (Chronicall Version 3.10.2d and newer)
As of Chronicall release 3.10.2d, the Chronicall Recording Library now has a built in SFTP for Windows. This removes the need for the use of the Freeftpd software.
Note: *Before configuring the SFTP, ensure that the Chronicall Recording Library (version 3.10.2d or later) has been installed.
To configure the SFTP follow these steps:
- Open Chronicall once you have installed Recording Library
- Go to System Settings -> Recording Libraries
- Click on the ellipses (...) next to "Recording Libraries".
a. Select the desired Recording Library
b. Select "Edit. - Select the ellipses to the right of "Recording Library FTP Server Configuration"
- Check the "Enable Recording Library FTP Server" box.
a. Enter a desired username and password for the SFTP to use
Note: Make note of the selected username and password as they will be used further on. - Restart the Recording Library service.
Test SFTP and Configure the Voicemail Pro
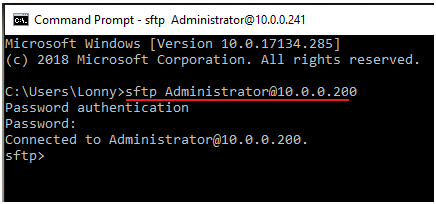
From the Linux or Windows terminal of the Voicemail Pro, you can test to ensure that it can connect to the SFTP by using a command as seen in the example below:

Note: Replace "Administrator" and the IP with the username created in step 5a and the IP address of the Recording Library machine.
If you receive an error saying the key is invalid, navigate to the known_hosts file at the location specified in the error and remove any lines with the ip of the Recording Library server. Then, save the file, then try the SFTP command again.
Voicemail Pro SFTP Configuration
- Open the Voicemail Pro Client and login
- Click the "Administration" option at the top of the screen.
a. Select "Preferences"
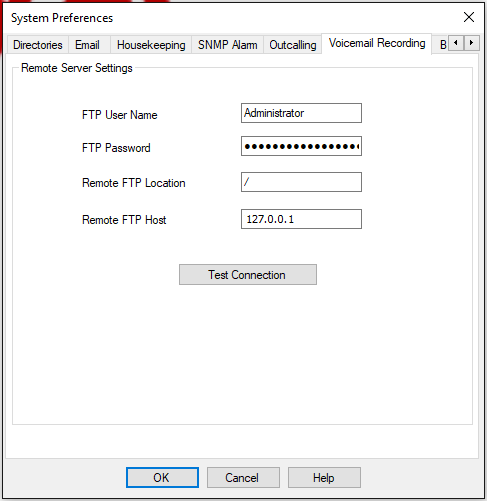
b. Select "General" - Go to the voicemail recording tab and enter the following settings
a. FTP Username: Username configured in step 5a
b. FTP Password: Password configured in step 5a
c. Remote FTP Location: /
d. Remote FTP Host: IP address of the Recording Library server.
See example below

- Click "Test Connection"
If the connection is successful then you should be good to go. If the connection is not successful review the above steps.
If you received a message saying the connection was successful in step 4 but you are still not seeing recordings, access the "Limbo" folder of the Recording Library. Try restarting Voicemail Pro.
Note: *It is possible to keep the Monitored directory pointed to the Live folder, as the / on the Remote FTP Location tells Voicemail Pro to put the recordings into Limbo.
You will need to schedule an after-hours reboot for Voicemail Pro to apply the changes.
Changing the Language
Before Changing the LanguageWhen changing the language, the list of Chronicall Standard Reports will not switch to the new language. Rather, the existing English reports will stay, and the new language counterparts will be added to the list. In other words, your list of reports will contain each report in English and a duplicate report in the selected new language.
If you don't want the English version of the reports to remain, you can delete all existing English reports before doing the language download. Simply select all reports in Standard Reports, right click, and select "Delete."
To Change the Language
- Upon logging into Chronicall, select "Admin (System)" from the options along the top of the page
- Select "Download Translation"
- Select your desired language
- Hit "OK"
Once the download is complete, the Standard Reports will now contain all standard reports and all future Realtime wallboards from this point on will be in the selected language.
A Note on the Realtime WallboardsIf any Realtime wallboards have been created prior to the download of the new language, the previously created wallboards will remain in English. However, any wallboards created after the language download has been performed will be presented with the downloaded language.
Updated 2 months ago