Configuration of SFTP for Windows
Starting with the Chronicall release 3.10.2d, the Chronicall Recording Library now has a built-in SFTP for Windows. This removes the need for the use of the Freeftpd software.
Setup the SFTP
Note: Before configuring the SFTP, ensure that the Chronicall Recording Library (version 3.10.2d or later) has been installed. SeeRecording Library Installation
Once Recording Library has been installed, open Chronicall.
- In Chronicall, select Admin (System) from the Chronicall Main Menu.
- Select "System Settings."
- Select "Recording Libraries," then the desired Recording Library, then "Edit."
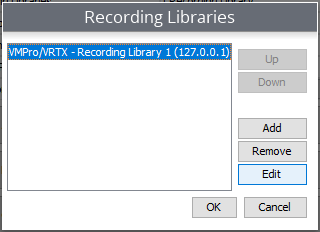
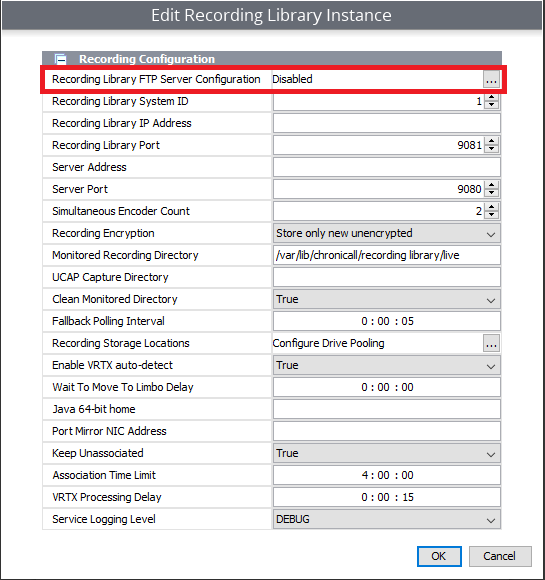
- Select the ellipses to the right of "Recording Library FTP Server Configuration."
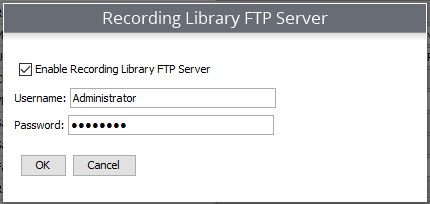
- Check the "Enable Recording Library FTP Server" box, then enter a username and password for the SFTP to use.
- Restart the Recording Library service.
Test SFTP and Configure the VM Pro
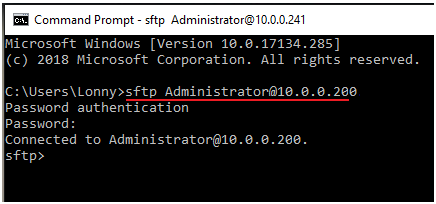
- From the Linux or Windows terminal of the Voicemail Pro you can test to ensure that it can connect to the SFTP by using a command as seen in the example below.
Note:
Replace Administrator and the IP with the username created in step five and the IP address of the recording library machine.
If you receive an error saying the key is invalid, navigate to the known_hosts file at the location specified in the error, and remove any lines with the IP of the Recording Library server. Then, save the file and try the SFTP command again.
Voicemail Pro SFTP Configuration
1). Open the Voicemail Pro Client and login.
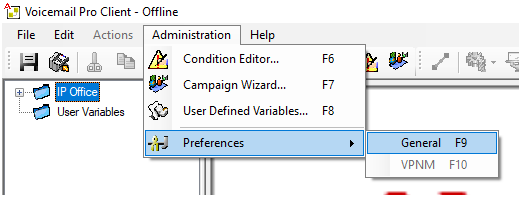
2). Click the "Administration" option at the top of the screen. Then go to "Preferences," followed by "General."
3). Go to the voicemail recording tab and enter the following settings:
- FTP User Name: Username configured in step five.
- FTP Password: Password configured in step five.
- Remote FTP Location: /
- Remote FTP Host: IP address of the Recording Library server.
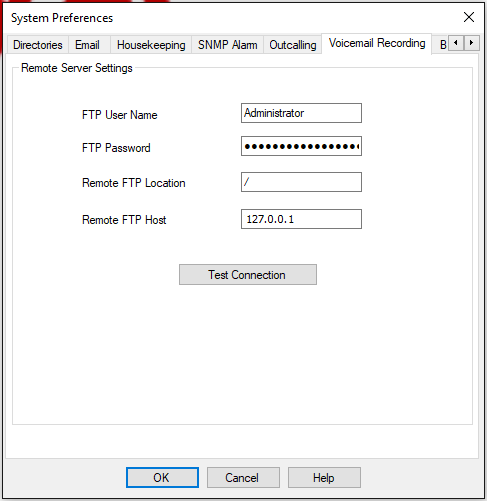
4). Click "Test Connection."
If the connection is successful, then you should be good to go. If the connection is not successful, then review the above steps.
Additional Troubleshooting:
- If you received a message saying the connection was successful in step four of the Voicemail Pro Configuration section, but you are still not seeing recordings, access the Limbo folder of the Recording Library. Try restarting the VMPro.
Note: It is possible to keep the Monitored directory pointed to the Live folder, as the / on the Remote FTP Location tells VMPRO to put the recordings into Limbo.
You will need to schedule an after-hours reboot for VMPRO to apply the changes.
Updated 3 months ago