Schedule Report - Java Version
This provides instructions on how to schedule a report automatically so that you don't have to go into settings every time and run the report manually.
Reports can be scheduled to run automatically by hour, day, week, and month. Once a report is scheduled, they can be sent directly to your email, saved to a server directory, and/or printed.
Before a scheduled report can be sent to your email(s), you will need to make sure that your SMTP settings are properly configured. To learn how to configure your SMTP settings, click here.
There are two ways to schedule reports:
- Through the "Standard Reports" window
- Through the "Schedule Report" option under "Reports" on main menu
Accessing Report Scheduler
Accessing Scheduler through Chronicall main page:
- Under the "Reports" section on the Chronicall main page, select "Schedule Report"
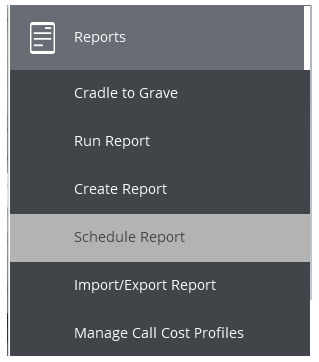
-
A window will appear. If previous reports have been scheduled, this window will display all reports previously scheduled.
-
In the bottom left-hand corner, select "New Schedule"
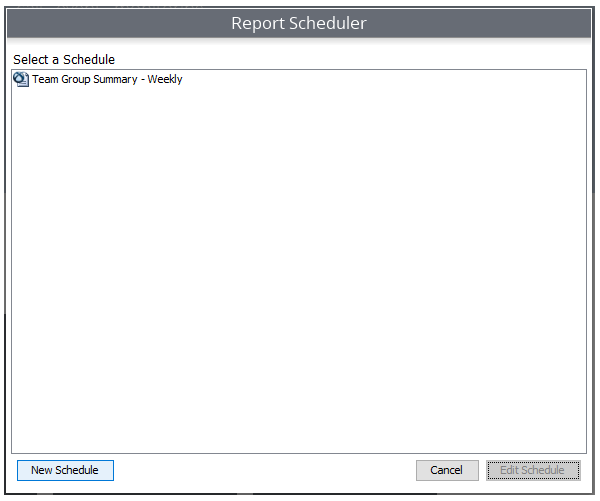
- Select the desired report to schedule and hit "Next"
Accessing Scheduler through the Standard Reports window:
- Under the Reports section on the Chronicall main page, select "Run Report"
- Locate the report that you would like to schedule, and right-click on the report. A menu will appear.
- Select "Schedule Report"
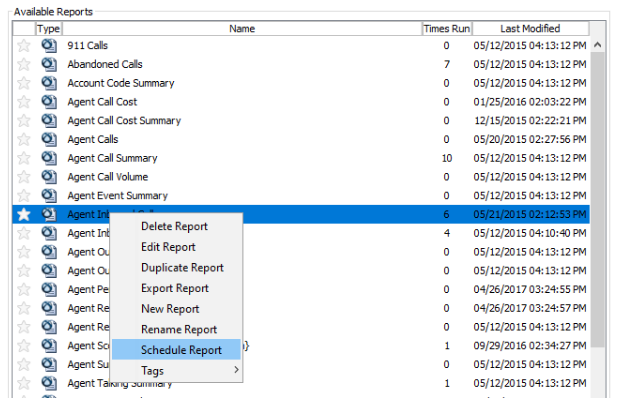
The Report Scheduler
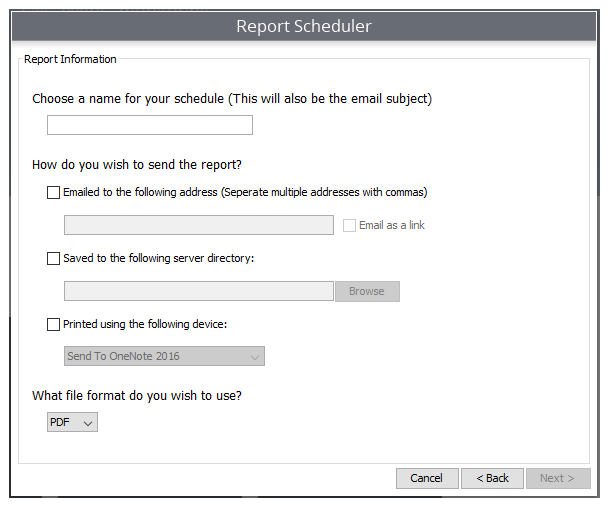
Once you access the Report Scheduler, a window will appear.
Window 1:
- Name the report schedule
- Select how you would like the report delivered
Emailed: Separate each email with a comma
Saved to any network drive
*Printed - Select format (PDF, XLS, HTML, CSV)
- Hit "Next"
Window 2: Select your delivery date, time, and frequency.
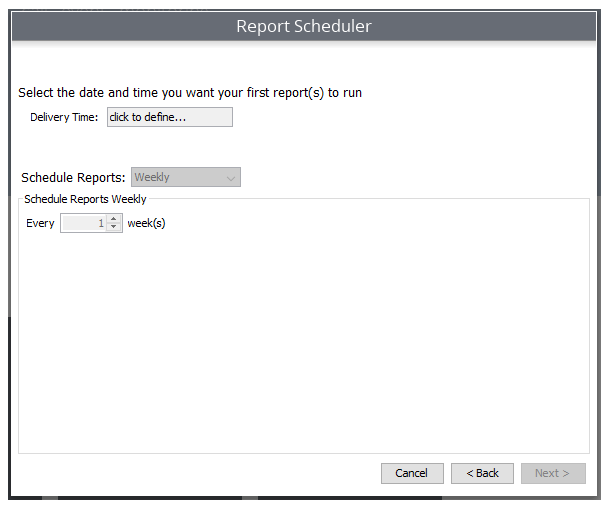
- Select "Click to define..."
Select your delivery date and time.
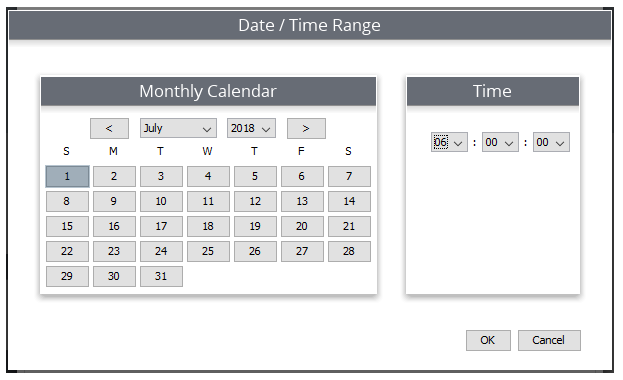
- Select the frequency of the report. You will be able to select from several options.
- Hourly: Select to run the report hourly throughout the day
- Daily: Select to run the report daily, every other day, every third day, etc.
- Day of Week: Select to run the report only on specific days
- Weekly: Select to run the report every week, every other week, etc.
- Monthly: Select to run the report every month, or by specific months. (You can run the report by date, or by day of the week; i.e., run it every first Sunday of the month.)
Window 3:
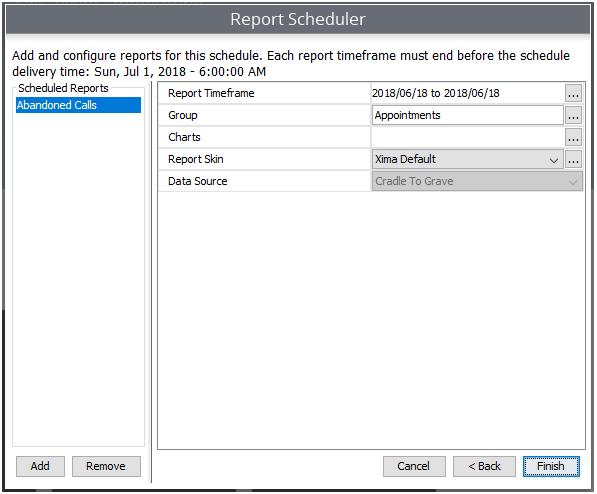
This window will recap the report, show which report you've chosen to schedule, display schedule run time, and show parameters for the report.
Select your timeframe:
Example: If you want this to be a monthly report...
- Open timeframe by selecting the ellipses
- As this report is a monthly report and is scheduled to run on July 1st, this will most likely be covering the previous month. If this is the case, we will select June 1st through June 30th.
Note: Chronicall is intuitive. Once a timeframe has been selected and the report is scheduled, it will continue to follow that same pattern. This means that on July 1st you will get a report covering June 1st through June 30th. The Scheduler will then move to August 1st, and on August 1st, you will get a report covering July 1st through July 31st. As a monthly report, it will report from the first day of the month to the last day of the month. The same rule applies for weekly reports (i.e., the report will continue to follow the pattern of reporting on the first day of the week to the last day of the week, respectively.).
- Hit "OK"
- Fill in the remaining parameters
- Hit "Finish"
Making Changes to a Scheduled Report
There may be times when you will need to make adjustments to an already scheduled report. In this scenario, there is no need to throw out the old report schedule and create a new one. You can simply make adjustments to the existing schedule.
- Under the Reports section on the Chronicall main page, select "Schedule Report"
- Select the desired scheduled report
There are five actions that can be performed with the scheduled report.
1. Rerun from the previous schedule

2. Run schedule now - Rather than wait for the report to run on its schedule, run it right now.

3. Create a new schedule using this schedule as a template - You can have multiple reports scheduled for the same days/times. This option allows you to quickly copy this same schedule for separate reports.

4. Edit the selected schedule - There are two ways to edit the schedule.
- Select the "Edit Schedule" button in the bottom right corner of the window
- Select the "Edit the Select Schedule" pencil tool
This allows you to make the desired changes to the specified report schedule (i.e., changes to emails, timeframes, groups, users, etc.).

5. Delete the Selected Schedule - If the report schedule is no longer needed, you can delete the schedule.

When editing the schedule, you can simply go through each window as if you were creating a new scheduled report and add/remove any changes or items to the existing schedule.
Updated about 2 months ago