Multimedia Installation Guide
This is a complete installation guide for the Contact Center (Multimedia) module, which means it has information on how to install and use Multimedia.
Introduction
Xima is introducing a new multimedia technology to the global marketplace that will, among other things, augment the native automatic call routing and distribution capabilities of Avaya IP Office telephony servers.
Due to the fast-paced dynamics in the telecom marketplace, there is an increasing need for small and mid-sized businesses to adopt enterprise-level contact center technology. Xima has built new technology into its core award-winning software, Chronicall, that will enable companies of all sizes to take advantage of the traditional enterprise-only feature sets.
Chronicall Multimedia Modules
Xima is making available the following software modules for use:
Skills-Based Routing. An advanced and more effective way to route calls to agents based on their skill group and skill level. You may create as many skill groups as you desire and place as many agents into the skill groups as you need. You may route calls to agents based on Most Idle Agent, Linear, Circular, or Intelligent Highest Skill First.
- Active Call Controls. From your instance of Chronicall on your PC, the Chronicall supervisor may:
- Log an agent into or out of a skill group
- Ready / Not Ready an agent
- Pull a call out of the queue or put a call into queue
- Transfer a call out of the queue to a specific individual or skill group
- Agent Dashboards. Each agent in the Chronicall Multimedia platform will have the ability from their PC screen, via the Chronicall Desktop client, to ready themselves in a skill group, make themselves "Busy" or unavailable to handle calls, or log themselves in or out of a skill group.
- Administrators may remove the agent’s ability to ready themselves for individual groups and only allow control of "Busy" status.
Queue Callback. This feature comes in handy when your customer no longer wishes to wait in queue on the phone. Rather, they can keep their place in the queue and the system will call them back when they are in queue position number 1 (wait in queue) or reserve the agent once available and connect them with the customer when it is their turn (reserve agent).
Web Chat Integration. Let’s face it, some of our customers do not want to talk with us. Instead, while on our website, they would prefer to engage in a web chat, rather than converse on the phone. Web Chat Integration allows your customers to do exactly that. When an agent is available, instead of picking up the phone, they will accept a chat and begin assisting your customer.
*Chat to be made available later this year.
Email Integration (available in Phase II).
Social Media Integration (available in Phase II).
Power and Progressive Outbound Dialing (available in Phase II).
Prerequisites
The following is a checklist of items required to put in place prior to installing Chronicall Multimedia:
Chronicall
- Chronicall Release 3.8.
~ If you are not on 3.8, you may upgrade free of charge, provided you have an active Xima Care license.
Chronicall Multimedia Hardware
*Must be a separate dedicated server away from Chronicall
- Windows Server OS (2008, 2012, 2016) or Linux (most all distributions)
- Either OS can be virtualized
- Dual Quad Core Processor
- 8-16GB RAM
- 500 GB Hard drive
- 1 Ethernet NIC (10/100 or 10/100/1000)
- One Chronicall Multimedia Server will support up to 250 active Skills-Based Routing and Queue Callback ports per server
~ Ex: If 500 agents are required, you will need 2 servers.
~ Ex: If 1,000 agents are required, you will need 4 servers, etc.
~ To note: Xima recommends a separate server for recording calls - Java for Windows (included in Chronicall Multimedia Installation Package) or Oracle Java for Linux (not included in the Chronicall Multimedia Installation Package)
Avaya Hardware
- Avaya IP Office V1 or V2 Telephony Server
- Avaya IP Office Server Edition
- Avaya Voicemail Pro ("Preferred Edition" or "Advanced Edition")
- Avaya Voice Compression Module (VCM) resources with licensing
~ One VCM resource is required for each call while in Chronicall’s Multimedia server
*If Avaya Voicemail Pro is not present, then calls will need to go directly to Chronicall’s Multimedia platform without Auto Attendant greetings, etc.
Avaya Software
- Avaya IP Office R5.0 or higher
- Avaya 3rd Party SIP Endpoint license
~ One 3rd Party SIP Endpoint license is required for 5 simultaneous calls in Chronicall Multimedia. Ex: if you have 10 calls being handled simultaneously by Chronicall Multimedia, then you would need to have 2 Avaya 3rd Party SIP Endpoint licenses active in Avaya IP Office for Chronicall Multimedia. - No Avaya CTI license at this point is required, unless you employ IP Office R10. If that is the case, then an Avaya CTI license is required for each node.
Installing the Multimedia Software on the Multimedia Server
After confirming the minimum specs are met for the dedicated Multimedia server, you will need to install a small software client on the server. The setup file for the client on Windows or Linux will be provided by a Multimedia application specialist during the installation process.
- During the Multimedia install, you will be prompted to enter the IP address of the Chronicall server (cannot be on same server).
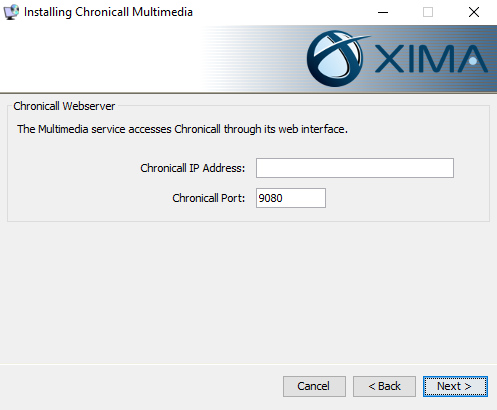
- After the install is complete, ensure the Chronicall Multimedia services are running.
How to Program Chronicall Multimedia Skills-Based Routing
Programming Avaya IP Office
Manager
Open Avaya IP Office Manager and pull a local system configuration.
Users
Purpose: To create new user accounts in Avaya IPO for each 3rd Party SIP Endpoint license needed for Chronicall Multimedia to route calls between Chronicall Multimedia and the actual agent.
To note: Chronicall Multimedia can use one (1) 3rd Party SIP endpoint license and route five (5) simultaneous calls from Chronicall Multimedia back to Avaya IP Office.
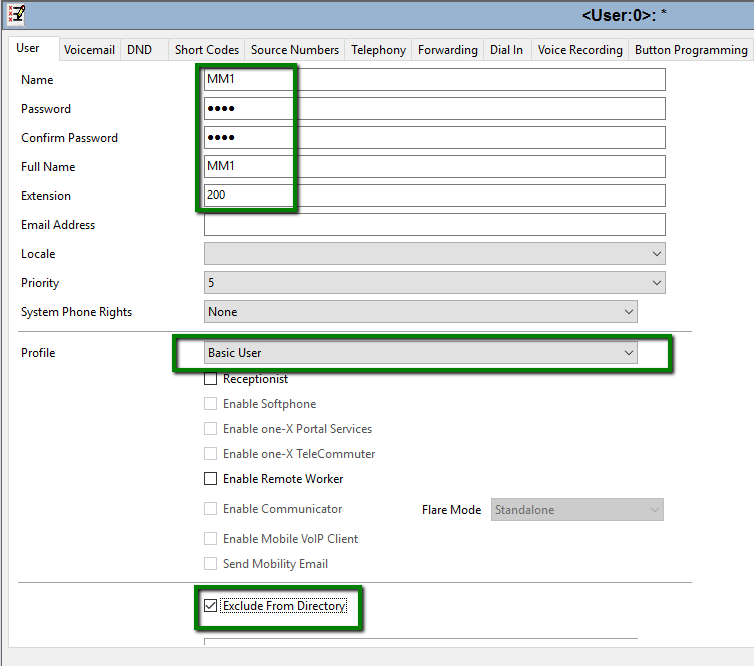
Step 1: Create a new User for each license of an Avaya 3rd Party SIP Endpoint with the following settings (ex: if you have 3 SIP endpoint licenses, create 3 new Users).
- Create a name on the User tab
- Create a password on the User tab
Re-enter the password in the "Confirm Password" field on the User tab. - Enter "Account Status" as "Enabled" on the User tab
*option not available in some older releases of IPO - Enter "Full Name" as described in the "Name" field on the User tab
- "Extension" on the User tab
- Profile drop-down set to "Basic User"
- Select "Exclude from Directory" on User tab
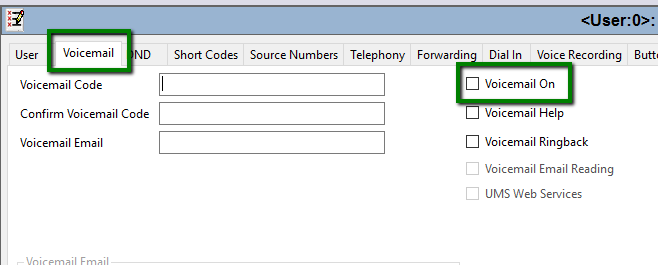
- Uncheck "Voicemail On" in the Voicemail tab
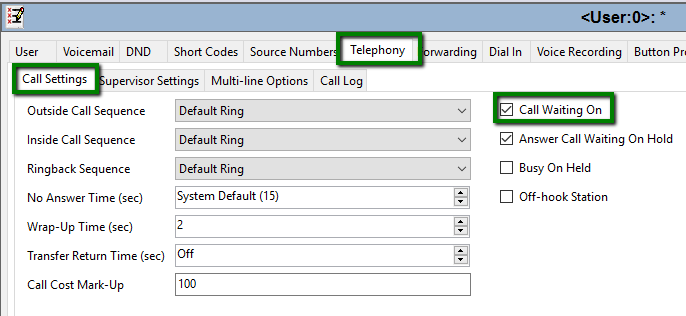
- Select "Call Waiting On" in Telephony tab
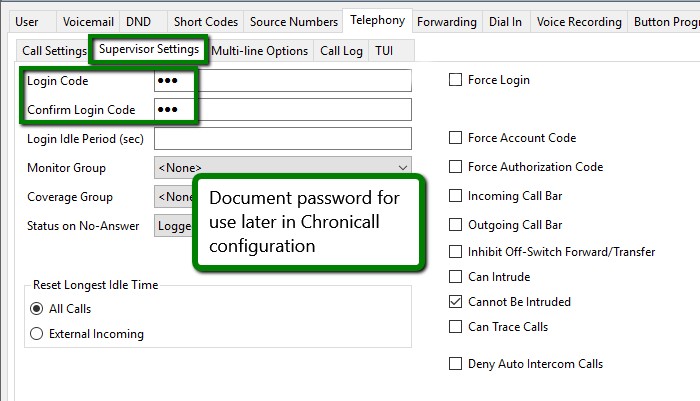
- In the Telephony tab of the User configuration, select the Supervisor Settings tab and enter a numeric password.
*Document this password as you will need it during the configuration in Chronicall.
Example:
- Name: MM1
- Password: (your discretion)
- Confirm Password: (your discretion)
- Account Status: Enabled
- Full Name: MM1
- Extension: 200
- Profile: Basic User
- Exclude From Directory: check marked
- Voicemail tab>Voicemail On Check Box: deselect
- Telephony Tab>Call Waiting On: check marked. Click "OK."
- Telephony Tab>Supervisor Settings : (numeric password)
- Click "OK."
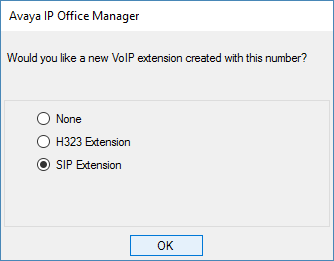
As you hit "OK" to add a new user, you will be prompted to create a new VoIP extension and also be assigned to the user account. Select "SIP Extension" and select "OK."
Repeat these steps for each 3rd Party SIP license that you have.
Extensions
Purpose: To assign the user accounts just created to actual SIP extensions or to create new SIP extensions so that Chronicall Multimedia can route calls to the actual agent.
Step 2: Go to the new SIP extension that was created. Verify that the user account that you created is assigned to the SIP extension.
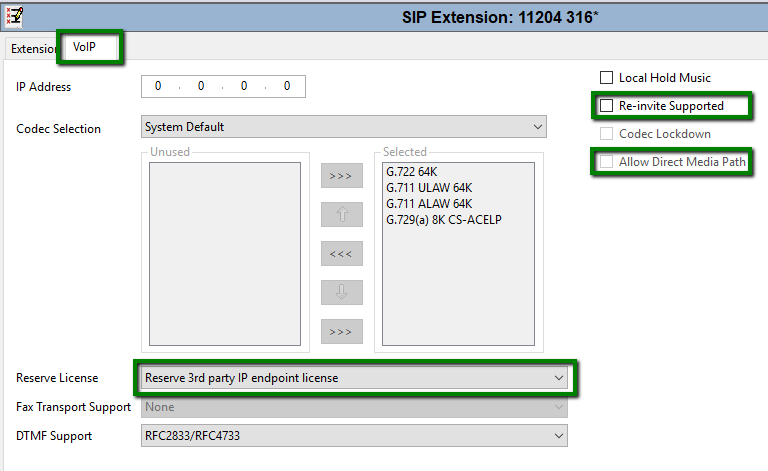
Step 3: Click on the VoIP tab and select from the "Reserve License" drop-down the option "Reserve 3rd party IP endpoint license." Also uncheck “Re-invite Supported” and “Allow Direct Media Path."
Hunt Groups
Purpose: This is to create a Hunt group in Avaya IP Office. This group will contain the SIP endpoint extensions and provide an overflow to failover group if all the endpoints are in use or the Multimedia server is down.
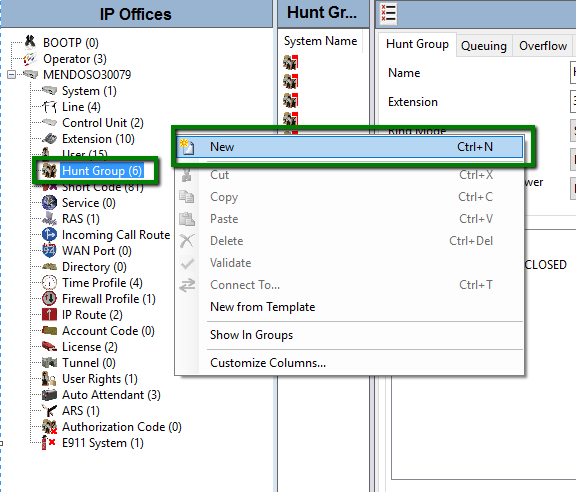
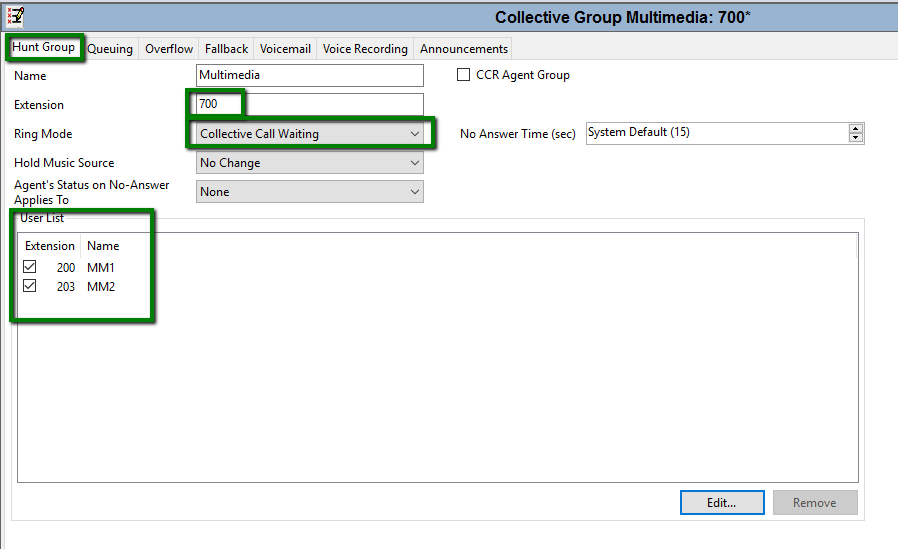
Step 4: Go to "Hunt Groups," right-click on "Group," and select "New."
- Create a new group
- Provide an appropriate extension number
- Ex: Multimedia with extension 700
Step 5: Place the SIP endpoint extensions (i.e. MM1, MM2, etc.) into the "User List."
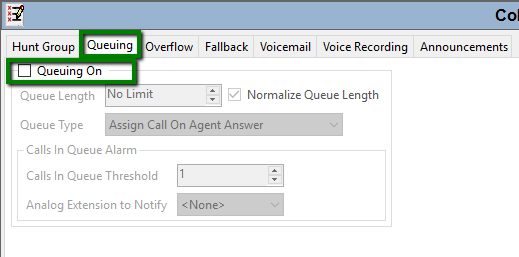
Step 6: In the Queuing tab, uncheck “Queuing On.”
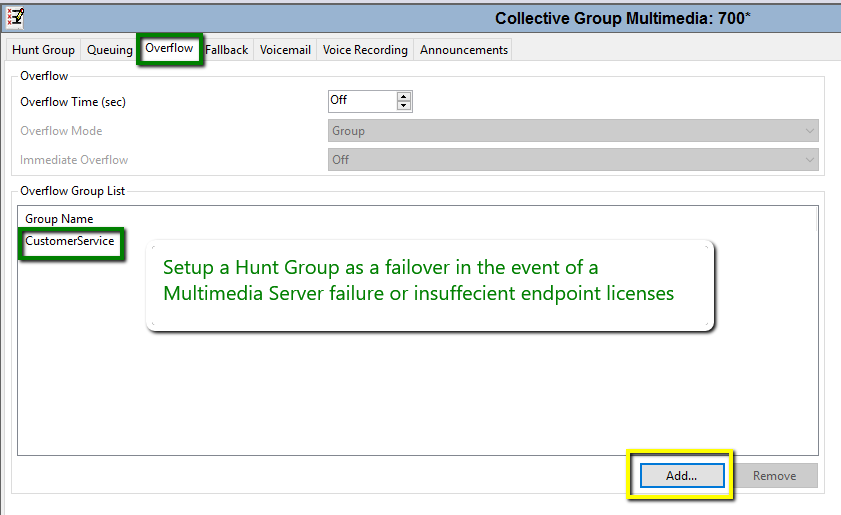
Step 7: In the Overflow tab, add any preconfigured or new IPO Hunt group for overflow calls in the event of a Multimedia server failure or insufficient endpoint license.
Note: There may be a primary failover set inside of VMPro, but a secondary in Manager is encouraged.
Press "OK" and "Save."
Incoming Call Routes
Purpose: This is to create an Incoming Call Route to direct calls to Voicemail Pro (Auto Attendant greetings).
Step 8: Select an Incoming Call Route or create a new one.
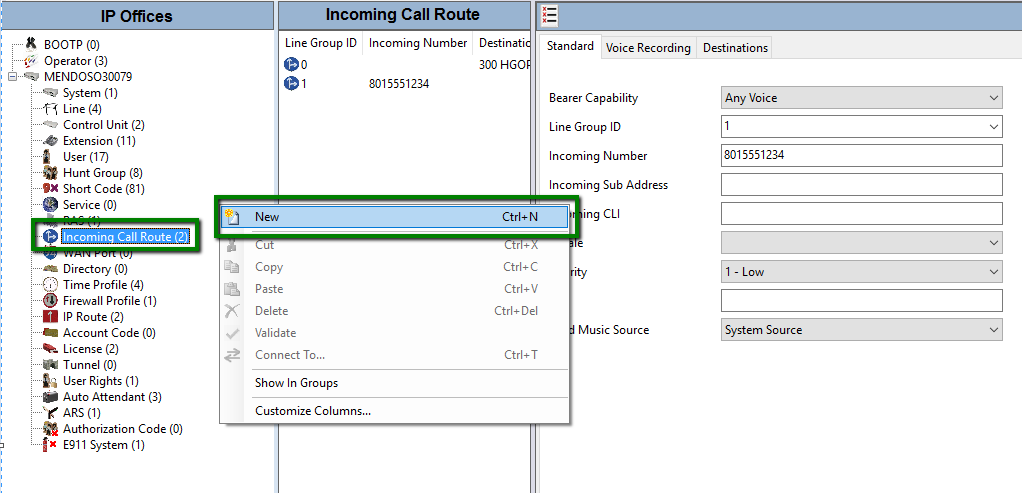
Step 9: Under the Destinations tab in "Default Value and Destination" field, type in "VM:Multimedia" and then hit "OK."

*You may choose to add a Fallback Extension of an IPO Hunt group in the destination in the event of a VMPro failure.
Programming Avaya Voicemail Pro
Voicemail Pro
Step 10: Create a call flow entitled "Multimedia"
- Right-click on "Modules" and select "Add."
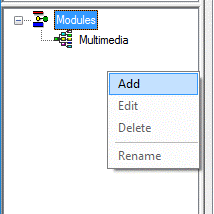
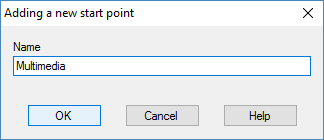
- A new window called "Adding a New Start Point" will appear. Type "Multimedia" into the name field and hit "OK."
Step 11: In the Multimedia call flow, create a menu to get callers to Chronicall Multimedia.
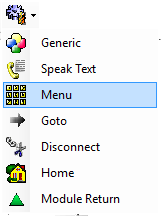
- Select "Basic Actions."
- Select "Menu" and drag it onto the screen.
-
In the menu, create a greeting in which you greet the caller and provide them either menu or Auto Attendant options. Create a menu option with at least one Touch Tone selection. Ex: 1
-
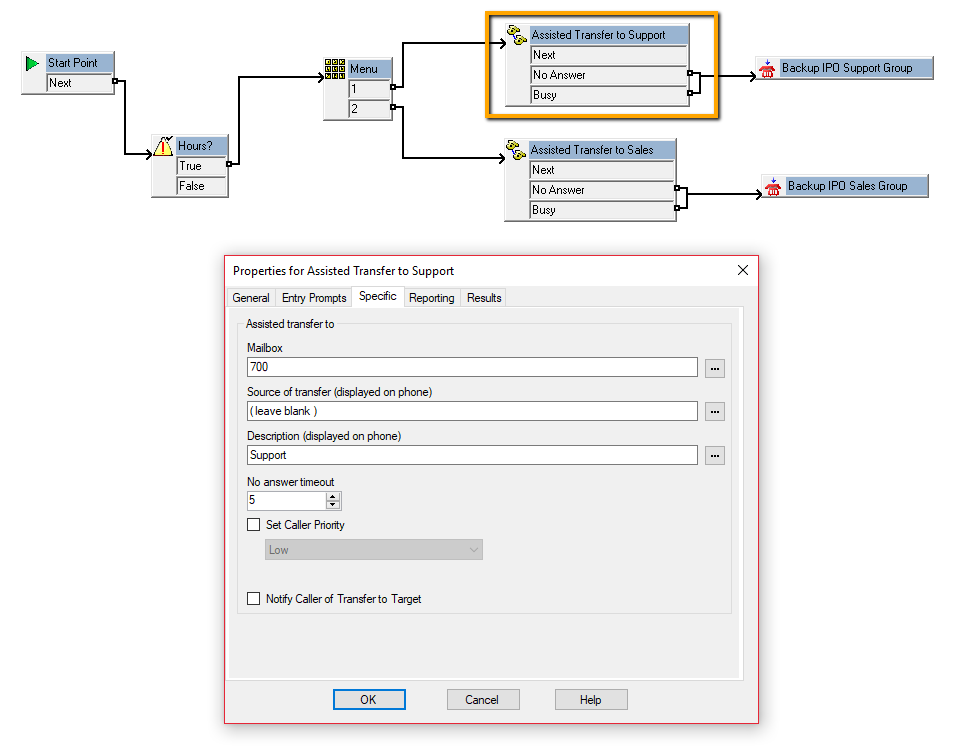
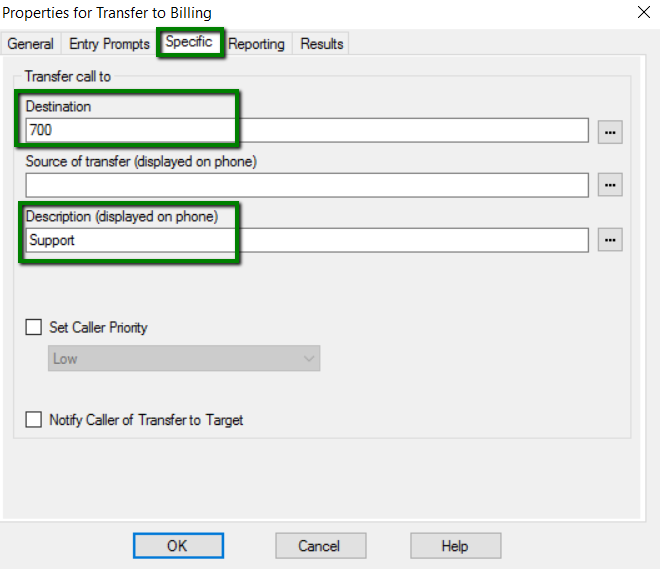
If the Auto Attendant option is to press 1 for Support, please insert an "Assisted Transfer" action from the Telephony options into the call flow and link the menu option 1 to the "Transfer" action.
-
Inside the "Assisted Transfer" action, select the "Specific" tab.
-
In the "Destination" field, type in the Multimedia Hunt group previously created in Avaya IP Office (from Step 4). Ex: 700
-
In the "Description (displayed on phone)*" field, enter a unique tag, which you will program later in Chronicall Multimedia, that this call should be routed with. Ex: Support
*DO NOT enter a value into the “Source of Transfer” field. -
Add additional "Assisted Transfer" actions for each touch tone option in the AA Menu and enter each Chronicall Skill group name into the description.
-
Create failover transfer events to send the caller to IPO Hunt groups in the event that the Multimedia services or handsets are non-responsive.
Programming Chronicall Multimedia Skill Groups
Purpose: This is to create the appropriate skills so that the Chronicall Multimedia server can send calls to the skills and agents.
Assigning Multimedia Agents
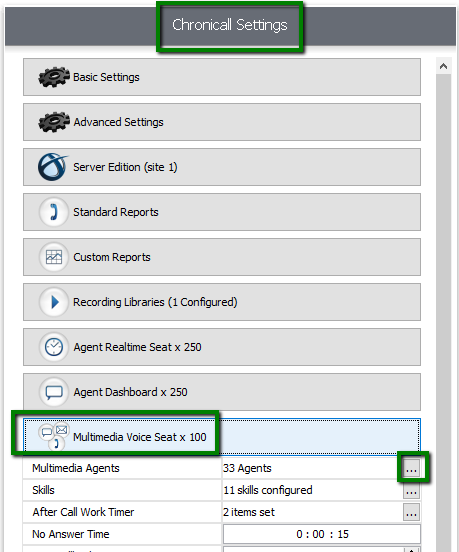
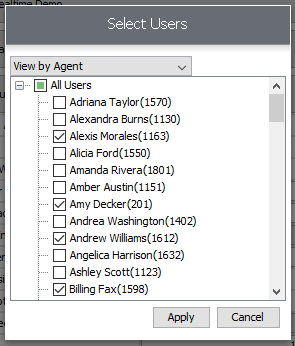
You will need to select which agents will eventually be assigned to which skill groups. This can be done in "Admin > System Settings > Multimedia Voice Seats." Simply select the appropriate agents in the "Multimedia Agents" field.
*Please note that these agents need to have a Realtime Agent Seat and an Agent Dashboards Seat to select them in this menu.
Add Multimedia Server Address
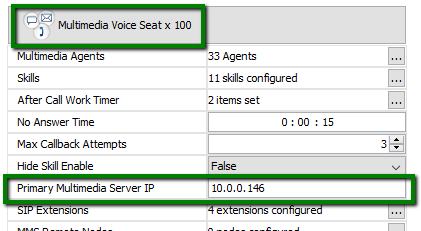
The location of the Multimedia server will also need to be programmed into the Chronicall settings.
Virtual Handset Logins
Based on the user profile extensions that were created in Avaya IP Office, which were assigned to new SIP extensions, those user extensions then need to be configured in Chronicall. Select the "SIP Extensions" ellipsis tool from the Multimedia Voice Seat menu.
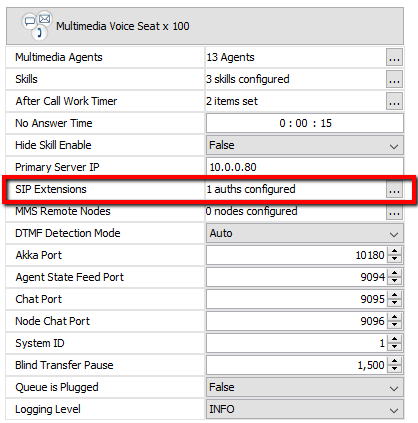
The SIP Extensions window will appear. Enter the user profile extensions created in Avaya IP Office under the Chronicall Multimedia "SIP Extension" field and the corresponding supervisor password from the same user extensions in Avaya IP Office in the "Password" field.
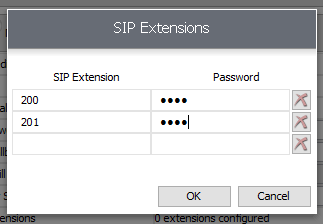
Hit "OK" to save. Save and exit system settings.
Registering Virtual SIP Extensions
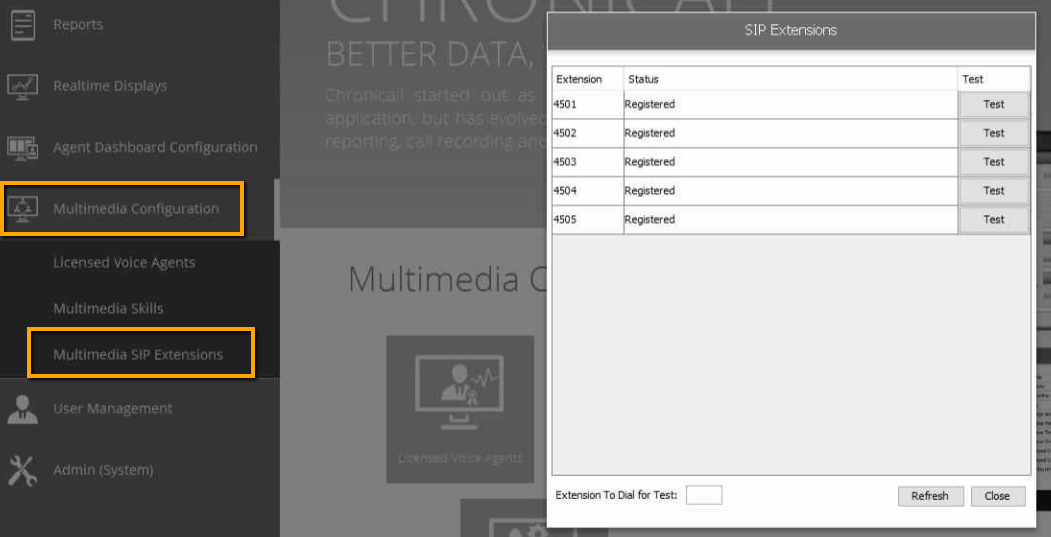
We recommend you restart the Chronicall Multimedia services to initiate a registration request between the Multimedia server and the IPO. After the service restart, check endpoint registration by selecting "Multimedia Configuration > Multimedia SIP Extensions" from the home screen of Chronicall.
*Ensure that the SIP Registrar is enabled in the IPO. System>LAN(1)>VoIP
Creating Skill Groups
In the Multimedia Voice Seat window, click on the "Skills" ellipsis tool, which is on the second row. This window will appear.
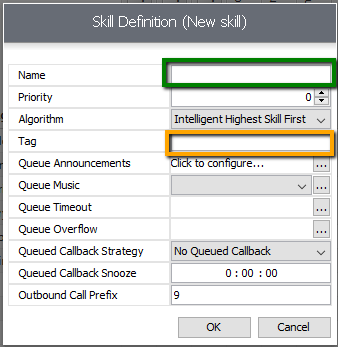
Place the cursor in the "Tag" text field and give your skill the name used in the "Transfer > Specific > Description" text field in Voicemail Pro as documented previously.
*Reminder: The skill name cannot include spaces.
The value used in the “Name” option does not need to match the previous description but will be the value used to represent this group in reports.
Priority. Select a numeric priority for the skill group. The options range from 0 to 10.
Algorithm. Select an algorithm. The choices are Most Idle Agent, Linear, Circular, and Intelligent Highest Skill First.
- Most Idle Agent: The call will be delivered to the agent with the most idle time
- Linear: The call will be delivered to the first agent in the list if available every time. If the first agent isn't available, then the call will go to the second agent and so on and so forth. Consider this a priority list.
- Circular: round-robin fashion
- Intelligent Highest Skill First: The call will be delivered to the top numeric skill agent, if available. If there are at least two or more agents with the same skill level and both are available for a call, Intelligent Highest Skill First will summarize the agent's skill level across all skills and deliver the call to the agent with the lowest overall skill level total, allowing the higher agent to be available for the next skill group call where they would be more valuable.
Tag. This provides a call descriptive tag to be sent back to Avaya IP Office for reporting purposes in Chronicall.
Adding Agents to Skill Groups
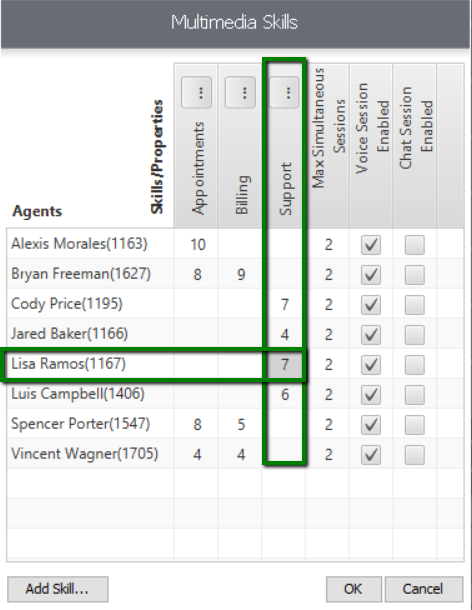
To add an agent to a skill group, simply give them a skill level in the intersecting cell between the agent name and the intended skill group.
- Longest Idle, Circular, and Linear routing:
~ Calls will be routed to all agents who have a number assigned to the skill group respectively based on the algorithm selected - Intelligent Highest Skill First:
~ Calls will be routed based on the skill level assigned.
~ The agent skill level can be any number from 1 to 10 where 1 is lowest skill level and least likely to receive skill group calls, and 10 is the highest skill level and most likely to receive skill group calls.
*If an agent is not given a skill level for a skill group, they cannot be enabled to take calls for the skill group.
Creating Queue Messages
Select the ellipsis tool on "Queue Messages." See image below.
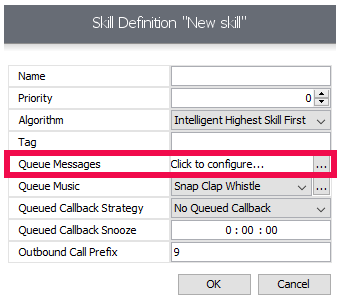
Once selected, this window will appear.
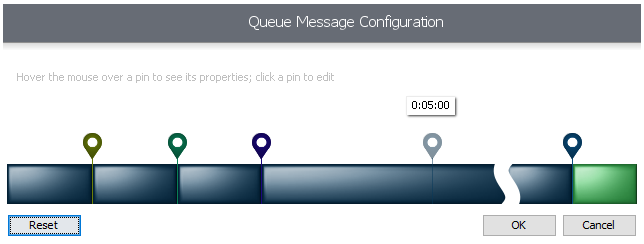
As you hover over the horizontal queue message configuration, a pin will appear. Once you click your mouse on the desired time interval, the pin will be placed. Once placed, the Edit Queue Sound menu will appear.
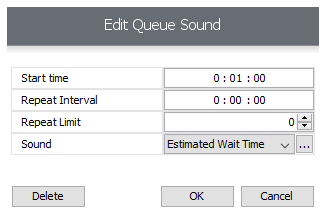
This will provide you the ability to:
- Create a "Start Time" for the queue message.
- Create the "Repeat Interval" for the queue message.
- Create the number of times you wish the queue message to be repeated ("Repeat Limit").
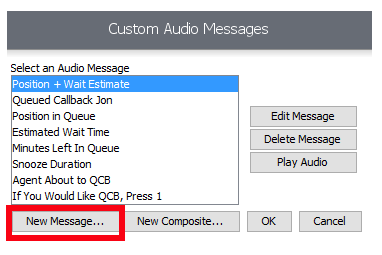
- Create the actual queue audio message. You can do this by clicking on the ellipsis tool to the far right. When you do, the Custom Audio Messages window will appear.
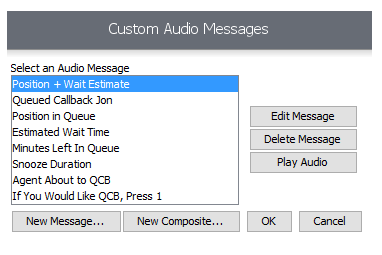
From this menu, you may:
- Create a new message
- Create a new composite message (combine multiple messages into one message)
- Edit a message
- Delete a message
- Play an audio message
To create a new message, click on "New Message."
The New Message window will appear.
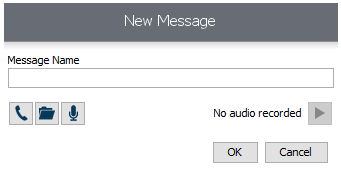
From this window, you may select:
- To record a new message via your telephone extension (handset)
- To record a new message from your PC microphone
- To import a recorded message from your PC or network. There are several different file formats supported. For a full list, click on the folder button and then, in the window that appears, you can drop down the "Files of Type" to view the list. Popular audio codecs are supported: .wav, .mp3, etc.
- Once complete, click "OK" to save.
Creating Queue Music
While callers are in queue, they will need to hear some form of hold music. With Chronicall Multimedia, this is easy.
Click on Queue Music ellipsis tool.
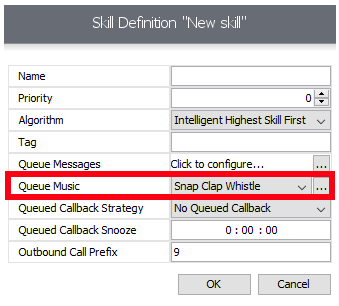
When you do, the Custom Music window will appear.
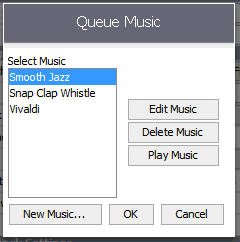
Similar to the Custom Audio Message window, use this window to create your queue music.
How to Program Queue Callback
Purpose: To provide callers waiting in queue the option to keep their place in line without having to wait on the phone. Queue Callback will call the customer back.
*Queue Callback license is required.
Queue Callback Strategy
Chronicall’s Queue Callback can be deployed, per skill group, in two different formats: "Wait in Queue" or "Reserve Agent."
Wait in Queue
When a queued call has made its way to the top of the waiting list and is now first in queue, Chronicall’s Queue Callback will call the customer back and offer the chance to speak with a representative. If the customer elects to rejoin the queue, the customer will then be in the queue waiting for an available agent. Once an agent is available, which is determined within the current call environment, Queue Callback will connect the agent and the customer. This is an effective strategy when average wait times in the queue are relatively short. Once you select a Queue Callback strategy, you will need to create your queue messages (as described in the section "Creating Queue Messages").
Reserve Agent
This works exactly the way as described above, but the customer and agent roles are reversed. This means that when the customer has worked their way to the top of the queue (first in line), and an agent is available, Chronicall’s Queue Callback will call the agent first. Once the agent joins, then the outbound call is placed to the customer in an attempt to bring the customer into the call. This is an effective strategy when average wait times in the queue are longer than desired. Once you select a Queue Callback strategy, you will need to create your queue messages (as described in the section "Creating Queue Messages").
Queue Callback Snooze
When a queue callback is made and the customer answers the phone, the default message is played, which indicates to the customer that if they need more time (snooze) they can press 2. By pressing 2, Queue Callback will attempt to call the customer again in the time interval specified below. The format is hour:minutes:seconds.
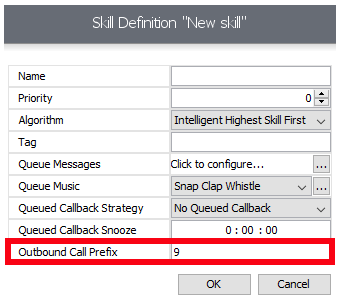
Outbound Call Prefix
Outbound Call Prefix is the prefix used to dial out from the PBX.
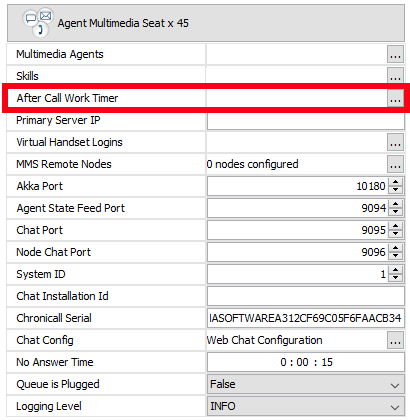
After Call Work Timer
Purpose: Once a call has ended, the agent will be placed in an After Call Work state, which means Chronicall Multimedia will not present or offer another call during this period. The After Call Work state can be associated with reason codes.
To program the After Call Work timer, navigate to the Agent Multimedia menu and click on the ellipsis tool.
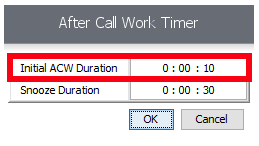
Initial After Call Work Duration
Once a call has ended, this is the initial duration that an agent will be unavailable for another Chronicall Multimedia call. The format is hours:minutes:seconds.
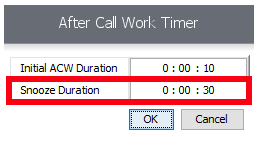
Snooze Duration
As the Initial After Call Work duration is expiring, a pop-up notification will appear on the agent’s desktop, asking if they need more time (snooze). If they select "yes," then they can accept the snooze and the agent will stay in After Call Wait for the snooze period programmed here:
Miscellaneous
Transferring Calls to a Chronicall Multimedia Skill Group
Purpose: If a user on the phone system would like to transfer an active call (inbound or internal call) into a Chronicall Multimedia skill group, you will need to program Avaya IP Office to do so.
Create a System Short Code
In Avaya IP Office, create a new System Short Code:
Code: Enter a unique extension number (ex: 600)
Feature: Voicemail Node
Telephone Number: Provide a name for the Voicemail Node (ex: Support)

Click "OK," "Save," and "Merge."
Create a Short Code in Voicemail Pro Client
In the Voicemail Pro Client configuration, create a new Short Code (add a new "Start Point"). Give the Short Code the same name as the System Short Code created in Avaya IP Office Manager (ex: Support).
In the working space, add a "Telephony Action >Transfer" to the call flow. In the "Transfer" properties under the Specific tab, enter the extension for the Multimedia Hunt group in Avaya IP Office in the Destination field (ex: 700 as outlined in the "Hunt Group" section). In the Description tab, type in the name of the Chronicall Multimedia skill group that the call is intended to go to.
When done, hit "OK," "Save," and "Make Live."
Updated 3 months ago