Alerts and Triggers
This provides information on how to set up alerts and triggers, as well as providing information on the different types of triggers you have available to you.
Chronicall provides the ability to receive notifications for various reasons. These are referred to alerts and triggers.
By configuring the alerts and triggers, you will be set up to receive notification when certain events or specified thresholds are hit. These notifications are sent in three separate formats.
- Desktop Screenpop
- Text Message
There are three levels of triggers:
- Standard Triggers - Most standard triggers don't require further licensing.
- Custom Daily Triggers - Requires Custom Reports
- Realtime Triggers - Requires Realtime
Emergency Numbers
As part of the Standard Triggers, you will have access to a Desktop notification for emergency calls.
To enable emergency notifications:
- Open System Settings on the Main Menu
- Select Basic Settings
3.Locate "Emergency Numbers" and select the ellipsis to the right - Enter your desired emergency numbers. (Remember to include all variations; for example, if your emergency number is 911 and your phone system requires that you dial '9' to place an outbound call, include both '911' and '9911' as emergency numbers.
Note: Emergency Numbers will contain a list of default emergency numbers. You are welcome to use the default numbers, as well as adding any phone number, or sequence of numbers for which you would like to be alerted to, when dialed.
Standard Triggers
Standard Triggers consist of three triggers:
- Emergency Call Notification - Sends alert when an emergency number is dialed (i.e., 911. However, it is not limited to 911)
- Logging Issue - Sends alert when Chronicall experiences a logging issue
- Disk Space - Sends alert when your server only has 10% disk space left
Note: If Recording Library has been purchased, there will be two options for Recording Library Alerts as well.
- Recording Issue
- Insufficient Recording Ports
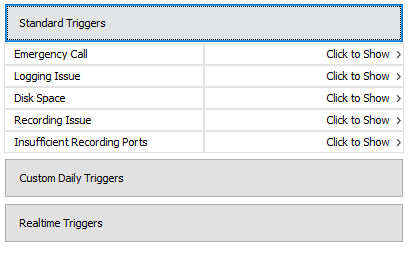
To configure the Standard Triggers:
- Under the Admin (System) section, select Alerts and Triggers
- Select Standard Triggers
- Select the Trigger that you would like to configure and select "Click to Show"
- You will have two options
- Desktop Notification
Email: To receive an email notification, simply click in the "email" text field and enter the desired email. Multiple emails can be added by separating each email with a comma.

Text Messages:
To send a text message alert, you will first need to know the "Text Message Gateway" for the cell phone service providers for your users, or for anyone that you would like to receive a notification
You can easily find that by using Google.
Example:
If my phone service provider was AT&T, I would search on Google for the Text Message Gateway for AT&T.
Once you have access to the text message gateway(s), in the same email line, type in the desired text message gateway(s).
Note: Remember to separate each email/text message gateway with a comma.
Desktop Notification:
It is also possible to receive a desktop notification when an emergency number is dialed
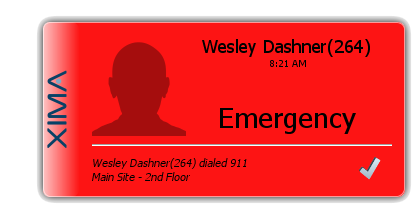
To configure the desktop notification:
- Hit "Click to Show" and select the ellipses tool "Desktop Notification"
- A list of users will now appear
- Select the desired users to receive the screenpop, and hit "OK"
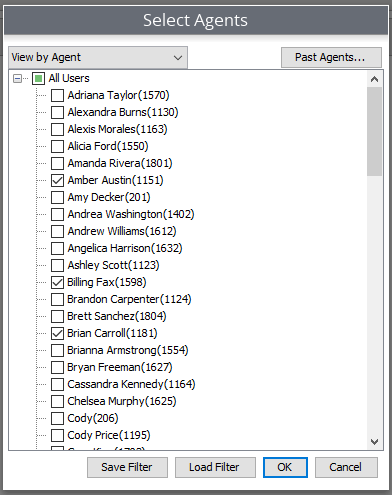
Once you've selected the desired users and message method, hit "Save"
Note: In order for a user to receive the desktop screenpop, they must have access and be logged in to the Chronicall Desktop.
Custom Daily Triggers
Note: You must have the Custom Reports module in order to have access to the Custom Daily Trigger section.
The Custom Daily Trigger runs once a day on the days of week you select and sends a notification if the set threshold has been reached. Meaning, you can have it monitor the reports to see if a specific threshold is hit. If it is, the trigger will send the notification. (i.e., If I select to have an alert sent if a report runs and shows more than fifty calls with a hold event longer than two minutes.)
To configure Custom Daily Triggers:
- Under the Admin (System) section, select Alerts and Triggers
- Select Custom Daily Triggers
- You can now enter the desired criteria for the trigger
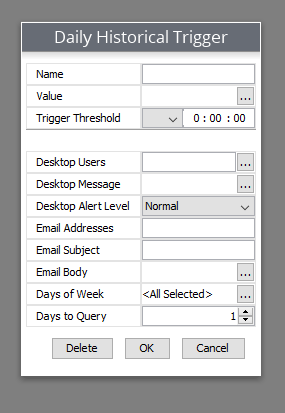
Criteria:
Name: Name the trigger
Value: Select the desired value to be monitored (i.e., General Call Count, General Call Duration, etc.)
Trigger Threshold: This will indicate the threshold value for the trigger. Meaning, if the threshold is hit, the alert will be sent.
Desktop Users: Select the users that you would like to receive the notification
Desktop Message: This is a customized message that will be added to the desktop notification
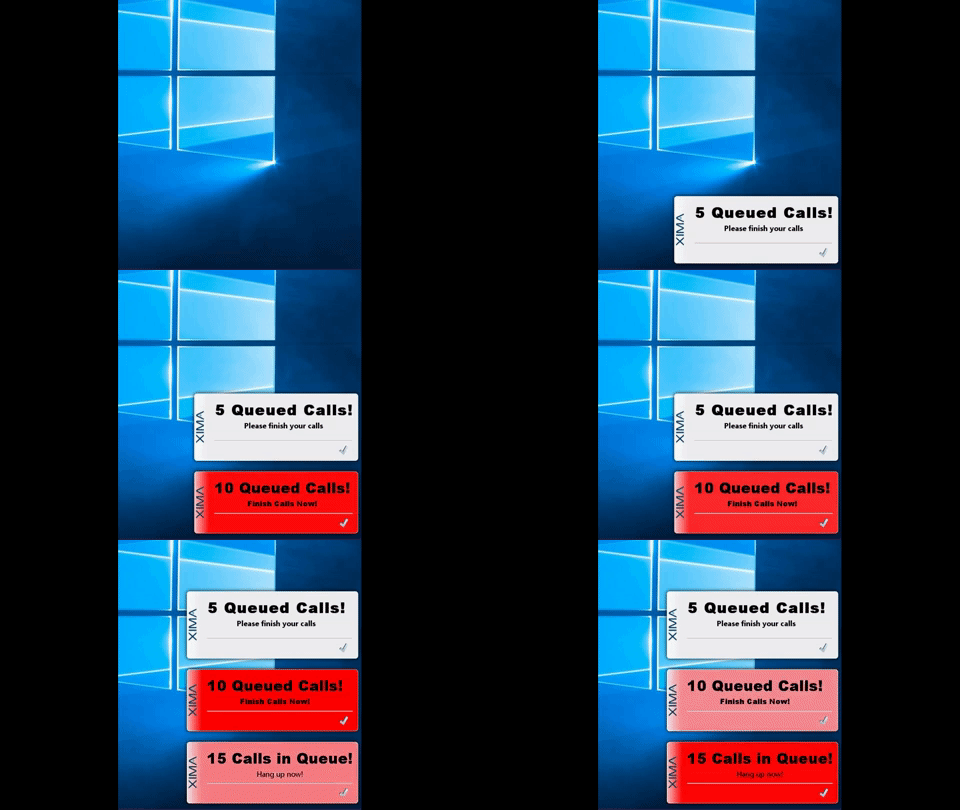
Desktop Alert Level: This allows a level of urgency to the alert:
Normal: Normal is the least pressing option. It will appear on the screen as a solid gray color.

Warning: Warning is slightly more pressing, and is the next level in urgency. It will appear and slowly flash between red and gray.

Emergency: Emergency is the most urgent trigger. It will appear and quickly flash between red and gray.

Email Addresses: Alerts can be sent through email. To send email notification, type in the address(es) to whom you would like to send the message. Separate each individual email with a comma.
Email Subject: This provides the purpose of the email.
Email Body: This allows a customized email message
Text Messages:
To send a text message alert, you will first need to know the "Text Message Gateway" for the cell phone service providers for your users, or for anyone that you would like to receive a notification
You can easily find that by using Google.
Example:
If my phone service provider was AT&T, I would search on Google for the Text Message Gateway for AT&T.
Once you have access to the text message gateway(s), in the same email line, type in the desired text message gateway(s).
Days of Week: Select the desired days to monitor. If the threshold is hit on the selected days, the notification will be sent.
Days to Query: This will query back the number of days that is selected. (i.e., if left at one day, it will only query back 1 day. If placed at three, it will query the last three days, etc.)
Realtime Triggers
Note: In order for the user to receive the desktop alert, there are two things that need to happen
- They must be assigned a Realtime License
- They must have access to the Chronicall Desktop (see Chronicall Desktop for Windows - Installation / Configuration)
Part of the Realtime module allows for Realtime Alerts and Triggers. This provides an alert function anytime that a specified Realtime threshold has been hit.
Criteria:
Name: Name the trigger
Value: Select the desired value to be monitored (i.e., Queued Calls, Abandoned Calls, Talking Durations, etc.)
Trigger Threshold: This will indicate the threshold value for the trigger. Meaning, if the threshold is hit, the alert will be sent.
Desktop Users: Select the users that you would like to receive the notification
Desktop Message: This is a customized message that will be added to the desktop notification
Desktop Alert Level: This allows a level of urgency to the alert (see above):
Normal: Normal is the least pressing option. It will appear on the screen as a solid gray color.
Warning: Warning is slightly more pressing, and is the next level in urgency. It will appear and slowly flash between red and gray.
Emergency: Emergency is the most urgent trigger. It will appear and quickly flash between red and gray.
Email Addresses: Alerts can be sent through email. To send email notification, type in the address(es) to whom you would like to send the message. Separate each individual email with a comma.
Email Subject: This provides the purpose of the email.
Email Body: This allows a customized email message
Text Messages:
To send a text message alert, you will first need to know the "Text Message Gateway" for the cell phone service providers for your users, or for anyone that you would like to receive a notification
You can easily find that by using Google.
Example:
If my phone service provider was AT&T, I would search on Google for the Text Message Gateway for AT&T.
Once you have access to the text message gateway(s), in the same email line, type in the desired text message gateway(s).
Updated 3 months ago