Setting Up and Using Web Chat
This provides information on how to set up and use Web Chat.
Setting Up Web Chat
- Navigate to the Chronicall main page.
- On the sidebar, click on “Admin (System)”
- Click “System Settings” on the drop-down menu
- Click “Multimedia Chat Seat.” Here you will see four options for you to customize. You only need to worry about two.

a. Chat Agents: Check and see that all of your agents are correctly licensed
b. Chat Config: When you click on the ellipsis on the right, a window will come up with options you can customize.
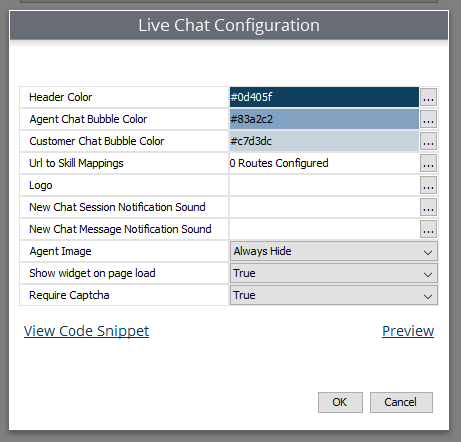
Live Chat Configuration Options
Header Color: This option allows you to customize the color of your header.
Agent Chat Bubble Color: This option allows you to customize the color of your agent chat bubble.
Customer Chat Bubble Color: This option allows you to customize the color of your customer chat bubble.
URL to Skill Mappings: This option allows you to have different skill group destinations depending on what page the snippet is embedded on.
##URL to Skill Mappings Configuration:
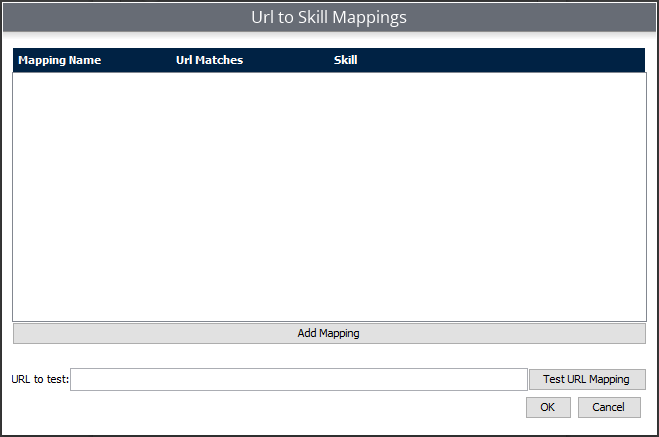
URL to Skill Mapping allows you to assign specific parts of your website to point your Web Chat towards a specific Skill group. For example, if you have a support skill, you can have the Web Chat assigned on your support site to go directly to the enabled agents in the Support skill group.
-
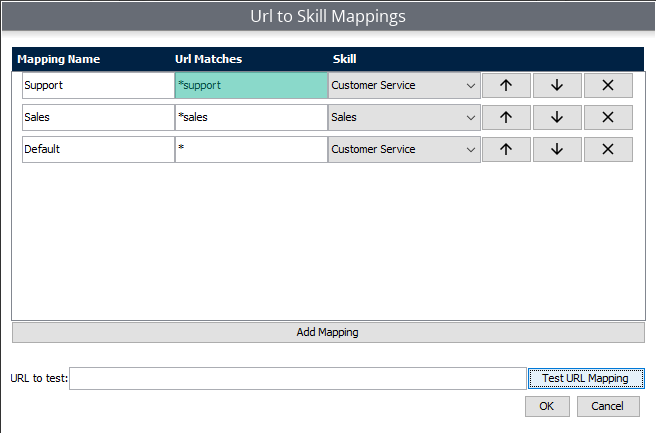
Select "Add Mapping" to create a new prompt for the web chat on your site.
-
Enter the name for this mapping
-
In the URL Matches column, match the end of the URL for the page you would like the web chat option to occur, preceded with a " * ".
For example: If the desire was to have the web chat option to be available on your support site, you would navigate to your support site URL, and copy the end portion of the URL and plug it in the URL Matches column (e.g., www.fakesite.com/***support***)
Logo: This option allows you to place your logo on the chat window.
New Chat Session Notification Sound: This allows you to customize the alert sound to the agent when a new chat session notification appears.
New Chat Message Notification Sound: This allows you to customize the alert sound to the agent when a new chat message notification appears.
Agent Image: This option allows your to either hide or show your agent’s image if a photo has been set in Supervisor View.
Show Widget on Page Load: This option allows you to choose whether or not you show your widget on the page load. Setting this value to “False” will prevent our chat UI from displaying. This allows an experienced web developer to use a different chat UI while still using our service to connect to agents. (not supported)
View Code Snippet: This is the HTML snippet we’ve provided that you will embed into your website code. This enables your Web Chat features to work on your website.

Accessing Web Chat Features
- Navigate to the Chronicall main page.
- Click the “Multimedia Configuration” tab on the left-hand side bar.
- Click “Multimedia Skills” in the drop-down menu that appears.
- A pop-up window will appear. To add a skill group, click the “Add Skill” button in the bottom left-hand corner of the pop-up window.
- A new pop-up window will appear that will allow you to customize your new skill.
LicensingAs a prerequisite, Web Chat agents need to have a Realtime Seat, Agent Dashboards Seat license, and at least one Skills-Based Routing seat license before they can access Web Chat licenses. It’s also important to know that Web Chat licenses are concurrent licenses, which means that any agent can use the licenses you have. For example, if you have 10 licenses and 20 agents, any 10 of those 20 agents can use the licenses.
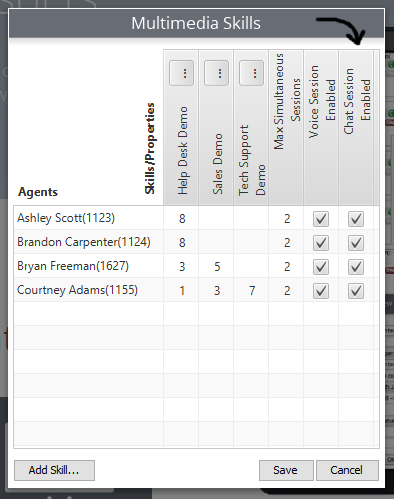
- When creating a skill, if you want your agents to be able to use Web Chat, you can check the box under the column that says “Chat Session.” This option allows you to control which agents can use the Web Chat licenses you have available.
- You can also change how many sessions an agent can field at a time under the column “Max Simultaneous Sessions.” A session would be something like a call or chat. An agent can only take one call at a time, but if you entered the number 3, they could also accept two chat simultaneously.
One thing to note is that Voice Skill Groups and Chat Skill Groups can be the same. If you look at the image below, you’ll notice the skills have settings for each. In the image, we have agents in “Inside Sales” taking voice calls and Web Chat.
- Click “Add Skill…” and a new window will pop up for you to customize your skill. The last section is where you’ll be able to personalize your chat settings. You may also select an existing skill group that will be utilized for both Voice and Web Chat functionality.
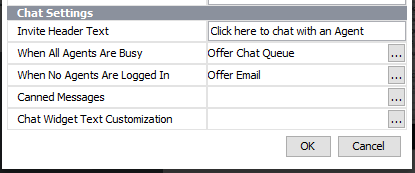
Chat Settings
Invite Header Text: You can customize what you want your header to say in your chat settings.
When All Agents Are Busy: You can choose what help you offer your clients when all of your agents are busy. Options include entering a queue, sending an email, or hiding the Web Chat invite from the website.
When No Agents Are Logged In: This box offers the same thing as “When All Agents Are Busy.” You can choose what help to offer your clients. Options include entering a queue, sending an email, or hiding the Web Chat invite from the website.
Canned Messages: This provides a way for you to write customized messages that will be saved and visible for your agents to select when responding to reoccurring customers' requests.
Chat Widget Text Customization: You can edit the default text seen throughout the Web Chat interaction.
How Web Chat Works
In order to receive a chat request, an agent needs to be logged into the Agent Dashboard (installed client) or the Contact Center Agent Client (HTML) and enable the chat channel.
Agent Screen Pops
A window will pop up on your agent’s screen or CCAC when a customer chat has been assigned to them. The agent can accept the chat by clicking on the checkmark or "Accept."
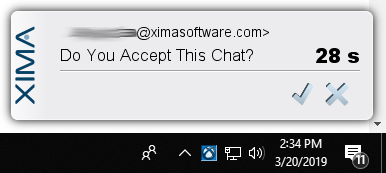
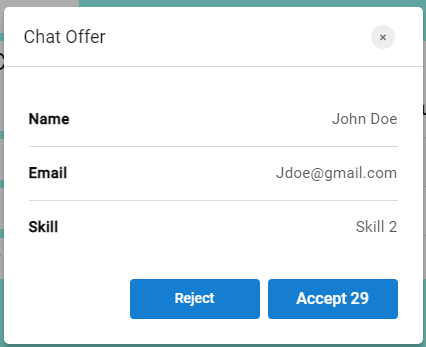
When using the Agent Desktop client, the agent can click on the ellipsis (“...”) > predefined messages or to access their canned messages, which are pre written responses your agent can use to chat with the customer.
When using CCAC, the agent can accomplish the same by clicking on the "templates" icon pictured below.

Agents also have the option to transfer the customer to someone else, transfer the customer to a separate skill group, and more. It’s important to note that a Web Chat agent’s job title depends on where the customer is in the website.
Benefits
A couple of benefits to remember with Web Chat are:
- All Web Chat information is reportable because it goes to Cradle to Grave.
- If you navigate to Admin > system settings > Multimedia chat > chat configuration > Preview, it will show you how your Web Chat will appear on your website as currently configured.
Updated 3 months ago