Linux Fresh Installation Guide
This provides a complete installation guide on how to install Linux.
1.0 Chronicall Specs
Avaya IP Office
10.0 or higher
IP Office Connection
Release 10.0 and above DevLink3
Virtual Machine Support
Yes
Avaya Licenses
IP Office 10.0+
User Computer Requirements (Web Interface)
Chrome, Firefox, Safari, Edge, or Opera
1280 x 720 or higher screen resolution
User Computer Requirements (Chronicall Desktop)
Windows 7+ (64 bit)
Max OS X 10.7.3+ (Intel-based)
1.1 Chronicall Server Requirements
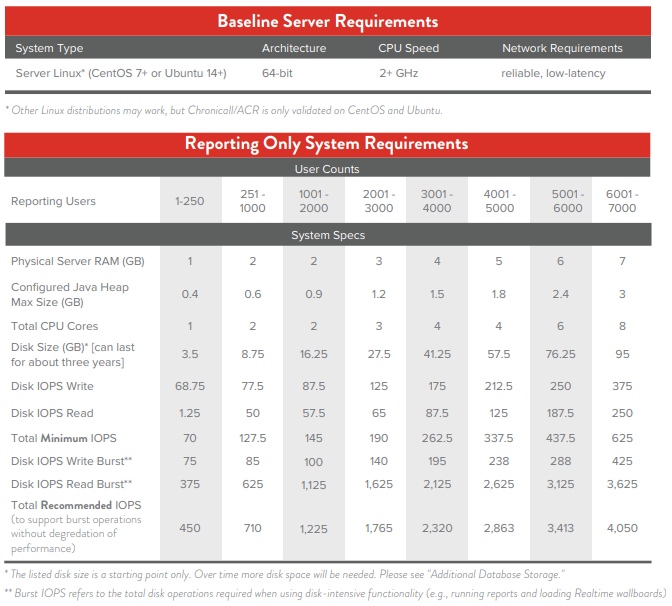
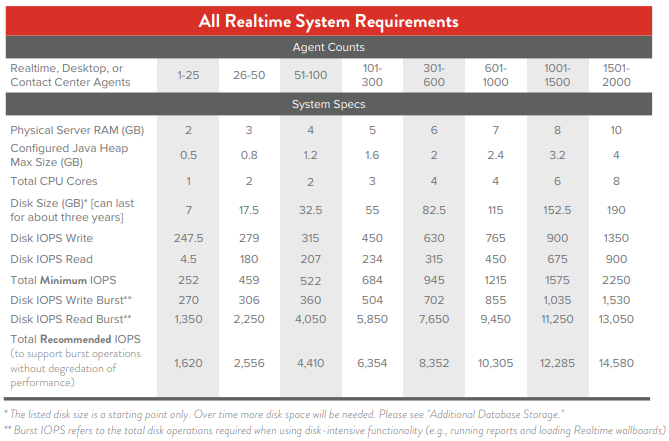
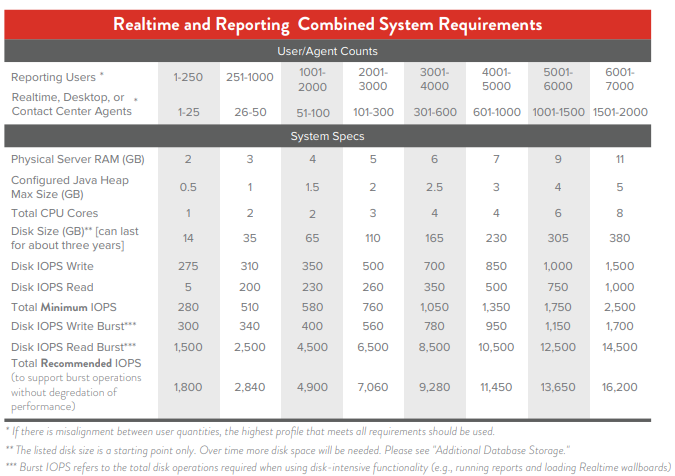
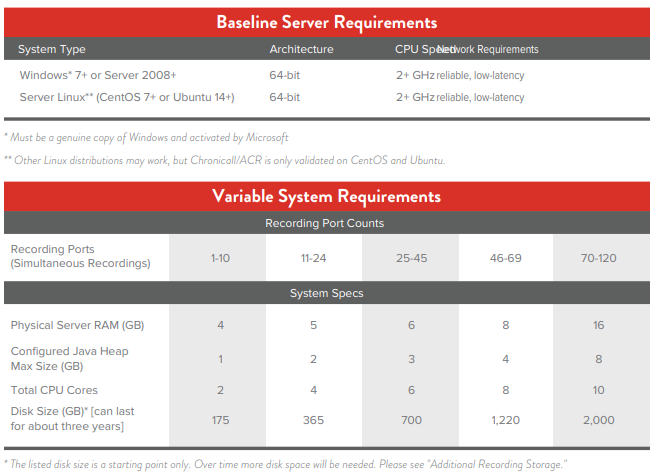
The following metrics and specifications assume the server is dedicated to hosting Chronicall and that no other resource-intensive software is running. Virus and security scanning software should be configured to not actively scan the Chroniall database, otherwise disk IOPS requirements will be higher than what is listed.
1.2 Additional Database Storage
1.3 Recording Library Server Requirements

1.4 Maximum Recording Port Capacity

1.5 Other Installation and Server Information
Installation Format
downloadable setup file
Installation Location
Chronicall cannot be installed on the same PC/server as IP Office Server Edition or the Application Server. Recording Library and Chronicall can be installed on the same PC/server as long as the combined resource usage does not exceed the server resource limits.
Listening Network Ports
80, 443, 8443, 9443, (SSL nginx proxy)
Database
BlueDB
Web Server
Apache Tomcat
User Interface
Web Interface and Chronicall Desktop Application
Chronicall OVA
https://chronicall-installation-ova.s3-us-west-1.amazonaws.com/Chronicall4_2_2b.ova
Username: administrator
Password: ximapass1!
2.0. IP Office Configuration
Prior to installing and configuring the Chronicall software, the IP Office configuration settings will need to be changed in order for Chronicall to perform at its highest level.
2.1. Enable Devlink3
The Devlink3 protocol is available for TCP or TLS. The IP Office Ports for TCP is 50797 and for TLS is 50796.
- From the IP Office Configuration tree in the left pane, select File > Advanced > Security Settings.
- Select System > the Unsecured Interfaces tab and check the TAPI/Devlink 3 box.
2.2. Administer Group Rights in Devlink 3
- From the IP Office Security Administration menu, select “Right Groups.”
- Create a new Rights Group and enter a descriptive name in the New Rights Group Details Window. For example, “DevLink3.”
- Go to the Rights Groups menu and select the group created in step two.
- Open the Telephony API’s tab in the right window.
- Check the DevLink3 option and press OK.
2.3. Administer Service Users
- From the IP Office Security Administration menu, select “Service Users.”
- Create a new Service User and enter the desired name and password in the New Service User Details window.
- Go to the Service User menu and select the new User Name created in step two.
- Select the Rights Group Membership in the bottom right pane and check the newly added
rights groups. - Press OK.
2.4. IP Office System Settings
- Go to IP Office Manager > System > Telephony and ensure that Show Account Code is checked.
a. For each Group do the following:
I. Ensure the group isn’t excluded from directory (uncheck Exclude From Directory)
II. Set each group to Longest Waiting, Sequential, or Rotary for accurate reporting.
III. If Queuing is enabled under the Queuing tab, then set the queue type to Assign Call on Agent Alert.
b. In User Settings, do the following:
I. Ensure that the user isn’t excluded from the directory (uncheck Exclude From Directory).
II. Go to the Telephony > Supervisor Settings tab and check Force Login.
2.5. Voicemail Pro Settings
For each Transfer action, ensure that the "Source of transfer (displayed on phone)" field under the Specific tab is blank.
3.0. Chronicall Standard Installation
Chronicall is a call reporting software that offers a revolutionary set of features designed to
overcome the limitations of traditional call history and reporting software. With a thin-client web interface, Chronicall provides detailed and accurate information by connecting directly to your phone system.
Follow the steps through this installation guide in order to set up, install, and configure Chronicall and Recording Library. Please note that the instructions here are based off of a debian install. The commands below are simply examples and may need to be changed based off of your Linux OS, file names, etc.
3.1. Chronicall
-
Open the command terminal and navigate to the directory where the setup file was downloaded. Extract the downloaded file.
tar -xzf Chronicall_Setup_4_0_6_IP_Office_deb_64_bit.tar.gz
-
Navigate into the new directory.
cd Chronicall_Settup_4_0_6_IP_Office_deb_64_bit
-
Run the setup by executing the install.sh file with administrative (root) privileges.
a. Use -serial to specify your serial key.
b. Additional options may be seen by using -help.**sudo ./install.sh -serial SERIALKEY1234567890ABCDEFGHIJKLM**
Setup
- Once the install is finished, open Internet Explorer and enter the given web address.
- Use the default username and password to login. This should be “Administrator” and “password”; both are case sensitive. You will be prompted to change the password once you log in.
4.0. Assigning Licenses
When you first log in to Chronicall after installation, it will ask you to add IP Office Connections and assign licenses.
4.1. Assigning IP Office Connections
The first window that you see after you login into Chronicall will provide the opportunity to add your IP Office Connections. To add IP Office connections, do the following:
- Select the “Add” button in the bottom right-hand corner.
- API: Select DevLink3
- Site Name: The default site name will be IP Office. Change this if desired (recommended if you are on a SCN or Server Edition).
- IP address of IP Office: Put in the proper IP address for your IP Office connection.
- DevLink3 Use TLS: Set to “True” if using TLS.
- DevLink3 Username: Enter the correct username to your DevLink3.
- DevLink3 Password: Enter the correct password to your DevLink3.
- External Trunks: Leave default.
- Hit “OK.”
- If you are on an SCN or Server Edition, you can add each additional site by repeating steps 1–9. In order for Chronicall to be accurate, each IP Office within the solution should be added.
- Once you are finished adding the IP Office connections, click “Next.”
4.2. Assigning Licenses
After the IP Office connections are configured, you will now be able to assign Chronicall licenses. Dependent on the licenses you have purchased, you will be prompted to configure additional settings and can assign user licenses to the desired users. The following windows that are presented will coincide with the modules that you have purchased:
Default User
You will be prompted to update the password for the Administrator account.
Licensed Users
The base licenses are static per-user licenses. They are assigned to a specific user and cannot be shared. This is necessary for basic reporting and other software functionality.* The base licenses can be transferred to other users as needed. To assign base licenses, do the following:
- Select the desired agents to monitor in Chronicall.
- Hit “Finish.”
Recording Retention Policy
A Recording Retention Policy should be created if desired. Fill out the options as needed. If a Recording Retention Policy is not needed, uncheck the option to “Delete old recordings to make room for new recordings” and click “Finish.”
Scheduled Backups
A Scheduled Backup should be created. Choose the frequency, add a backup path, and limit the total backups retained as you desire. Once completed, press “Finish.
Agent Realtime
Agent Realtime licenses are static per-user licenses. They are assigned to a specific user and cannot be shared. The Realtime Agent license can be transferred to another user as needed. To assign Realtime Licenses, do the following:
- Select the desired agent(s) to monitor in Realtime
- Hit "Finish."
Agent Dashboards
Agent Dashboards licenses are concurrent licenses, meaning that they can be shared as long as two users are not utilizing it simultaneously. The licenses can be prioritized, listing agents based on high/low priority.
- In the left-hand column, select the desired user and select the center arrow pointing to the right.
- Repeat with each desired user.
- Users will be prioritized from top to bottom. To prioritize the users, use the “Up” and “Down”
buttons on the right to change a user’s position. - Hit “Finish.”
5.0. Recording Library Installation for Active Recording
When installing Recording Library, there are two standard choices: Devlink Active Recording and Voicemail Pro. Follow the steps under the specific section that matches your needs. This section covers the steps to install and configure Active Recording. Note that Active Recording requires Chronicall Recording Library licenses.
5.1. Recording Library Installation
-
Download the Chronicall Apps Setup.
-
Navigate to the directory where the file was downloaded. Extract the downloaded file.
tar -xzf Chronicall_Apps_Setup_4_0_6_IP_Office_deb_64_bit.tar.gz
-
Navigate into the new directory.
cd Chronicall_Apps_4_0_6_IP_Office_deb_64_bit
-
Run the setup by executing the install.sh file with administrative (root) privileges.
a. Use -chron_docbase to specify your Chronicall server IP address and port. For example, if you installed Chronicall on a server with IP address 10.20.30.40, then enter http://10.20.30.40:9080. Do not use localhost:9080 or 127.0.0.1:9080 if you are installing the Recording Library on the same server as Chronicall. The exact IP address and port must be specified.
b. Use -recording_library to specify if you wish to install Recording Library.
c. Use -rec_sys_id to specify the Recording System ID (normally 1).
d. Additional options may be seen by using -help.**sudo ./install.sh -chron_docbase http://20.20.30.40:9080 -recording_library -rec_sys_id 1**
On versions 4.2.10 and above, there are two additional required parameters: -admin_user and
-admin_password. Replace the username and password with an actual Administrator username and password for Chronicall.
5.2. Active Recording Configuration
- Open Chronicall once you have installed Recording Library.
- Go to System Settings > Recording Libraries.
- Click on the ellipsis next to “Recording Libraries.”
- Select Devlink Recording - Recording Library 1.
a. If no recording library exists, click “Add.”
b. Click on the drop-down and select “DevLink Active Recording.” - Review the following settings.
a. Recording Library IP Address: Enter the IP address of the server that the Recording Library is installed on.
b. Recording Library Public IP Address:
I. If using On Premise, leave blank.
II. If using Powered by Avaya and Recording Library is on a separate server from Chronicall, the Recording Library will require a public IP. Please enter the public IP address for the Recording Library server.
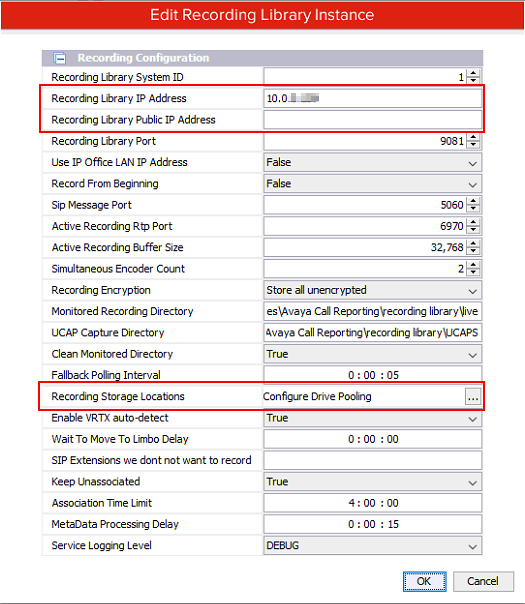
c. Recording Storage Locations: Configure where the recordings will be stored. The default will be the recording library directory where the Recording Library was installed. You will also be able to manage your retention policies here.
6. Press OK and Save.
5.3 Recording Rules
- Go to System Settings > Recording Libraries.
- Click on the ellipsis next to “Recording Rules.”
- Click “Add.”
- Select the Recording Rule template that is desired and enter the desired settings. The most common Recording Rule template is Agent. For example:
a. Select the agents you wish to record.
b. Choose the percentage of calls you wish to record.
c. Give the Recording Rule a title. - Press OK and Save.
6.0. Recording Library Installation for Voicemail Pro on Linux
When installing Recording Library, there are two standard choices: Devlink Active Recording and Voicemail Pro. Follow the steps under the specific section that matches your needs. This section covers the steps to install and configure Recording Library for Voicemail Pro when the Voicemail Pro is installed on a Linux server. You will be installing Recording Library on a Linux server and then utilizing the Voicemail Pro’s built in FTP service to retrieve the recordings. Note that Call Recording with Voicemail Pro requires Avaya Voicemail Pro software licenses and Chronicall Recording Library licenses.
6.1. Recording Library Installation
-
Download the Chronicall Apps Setup
-
Navigate to the directory where the file was downloaded. Extract the downloaded file.
tar -xzf Chronicall_Apps_Setup_4_0_6_IP_Office_deb_64_bit.tar.gz
-
Navigate into the new directory.
cd Chronicall_Apps_4_0_6_IP_Office_deb_64_bit
-
Run the setup by executing the install.sh file with administrative (root) privileges.
a. Use -chron_docbase to specify your Chronicall server IP address and port. For example, if
you installed Chronicall on a server with IP address 10.20.30.40, then enter
http://10.20.30.40:9080. Do not use localhost:9080 or 127.0.0.1:9080 if you are installing the
Recording Library on the same server as Chronicall. The exact IP address and port must be
specified.
b. Use -recording_library to specify you wish to install Recording Library.
c. Use -rec_sys_id to specify the Recording System ID (normally 1).
d. Additional options may be seen by using -help.**sudo ./install.sh -chron_docbase http://10.20.30.40:9080 -recording_library -rec_sys_id 1**
6.2. Prepare a New Directory
-
Next, we need to prepare the server so that the Voicemail Pro can connect with FTP and deposit recordings. Identify or create a user account that can be used by the Voicemail Pro to connect. For example, you may have a user account called Admin.
-
Make a directory on the Recording Library server within the identified user accounts home profile. For example, you could create the following directory /home/Admin/VmProVRL. This is where the recordings will be sent by the Voicemail Pro.
mkdir /home/Admin/VmProVRL
-
Give the directory full permissions.
chmod -R 777 /home/Admin/VmProVRL
-
Lastly, we need to ensure the sshd service is running. Most Linux distributions by default come with OpenSSH, which provides the needed SFTP functionality and is how PuTTY and other SSH/SFTP clients are able to connect.
service sshd status
6.3. Voicemail Pro FTP Configuration
- Connect to the Voicemail Pro via Command Line.
a. Log in to the root level of the Voicemail Pro.
b. Enter a SFTP command to connect to the Recording Library.
i. For example, if the username I use to log in to the Linux server with Recording Library installed was Admin and my Recording Library server IP address was 10.11.12.13, I would enter “sftp [email protected]”.
ii. Accept the RSA key if it is offered during the SFTP connection.
iii. When prompted “Are you sure you want to continue connecting (yes/no)?” type “yes.”
iiii. Enter your password (the password for the Recording Library server user) when prompted.
c. Once connected, you can enter “exit.” - Open the Voicemail Pro Client.
- Click the Administration option at the top of the screen, then hover over Preferences and select General.
- Go to the Voicemail Recording tab and enter the following settings.
a. FTP Username: Enter the username from the Recording Library server.
b. FTP Password: Enter the password from the Recording Library server.
c. Remote FTP Location: Enter the name of the shared directory on the Recording Library server (in our
example we used VmProVRL).
d. Remote FTP Host: Enter the IP address of the Recording Library server. - Press “Test Connection” to confirm the connection can be established.
- Save and Make Live the settings.
- Reboot the Voicemail Pro.
6.4. Recording Library Configuration for Voicemail Pro on Linux
- Open Chronicall once you have installed Recording Library.
- Go to System Settings > Recording Libraries.
- Click on the ellipsis next to “Recording Libraries.”
- Select VMPro - Recording Library 1.
a. If no recording library exists, click “Add.”
b. Click on the drop-down and select “VM Pro.” - Review the following settings.
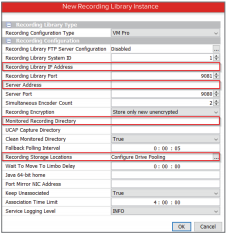
a. Recording Library IP Address: Enter the IP address of the server
that the Recording Library is installed on.
b. Server Address: Enter the IP address of the server that the Avaya
Call Reporting is installed on.
c. Monitored Recording Directory: Enter the directory path used in
Section 6.2. For example, /home/Admin/VmProVRL
d. Recording Storage Locations: Configure where the recordings will
be stored. The default will be the recording library directory where
the Recording Library was installed. You will also be able to
manage your retention policies here. - Press OK and Save.
6.5. IP Office Configuration
Decide how you’d like the recordings to be created, either at the User, Group, Incoming Call Route, or Account Code. The most common configuration uses User-Level.
User-Level Call Recording
- Open Avaya's IP Office > Manager > IP Office Configuration.
- Select "User" from the middle bar.
- Select a user whose calls you would like to record.
- In the individual user's window, select the "Voice Recording" tab.
- Select the percentage of outbound and inbound calls to record in the Recording Outbound and
Recording Inbound fields. Select "On" to record all calls. You may also change the External field to
External & Internal if you wish to record internal agent calls as well. - Select Voice Recording Library in the Destination field for both the Recording (Auto) and
Recording (Manual) menus. - Press OK > Save > and Merge.
Group Level
- Open Avaya's IP Office > Manager > IP Office Configuration.
- Select "Group" from the left sidebar.
- Select a group whose calls you would like to record.
- In the specific group’s menu, on the far right, select the "Voice Recording" tab.
- Select the percentage of inbound calls to record in the Recording Inbound field. Select "On" to
record all calls. - Select Voice Recording Library in the Recording (Auto) field.
- If you wish to record internal group calls as well, set Auto Record Calls to External & Internal.
- Press OK > Save > Merge
Incoming Call Level
- Open Avaya's IP Office > Manager > IP Office Configuration.
- Select "Incoming Call Route" from the left sidebar.
- Select an incoming call route you would like to record.
- In the call route menu, navigate to the "Voice Recording" tab.
- Select the percentage of inbound calls to record in the Recording Inbound field. Select "On" to
record all calls. - Select Voice Recording Library in the Recording (Auto) field.
- Press OK > Save > Merge.
Account Code Level
- Open Avaya's IP Office > Manager > IP Office Configuration.
- Select "Account Code" from the left sidebar.
- Select an account code whose associated calls you would like to record.
- In the account code window, navigate to the "Voice Recording" tab.
- Select the percentage of outbound calls to record in the Record Outbound field. Select "On" to record all calls.
- Select Voice Recording Library in the Recording (Auto) field.
- Press OK > Save > Merge.
7.0. Accessing HTML Chronicall and Contact Center Agent (CCAC)
7.1. Accessing HTML Version of Chronicall Through a Web Browser
- Select the modern web browser of your choice. Google Chrome is recommended.
- In the URL, type in the Avaya Call Reporting server IP address followed by a colon, then the Apache
Tomcat port (typically 9080 by default), forward slash ‘web’. Example: 12.3.4.567:9080/web
7.2 Accessing Chronicall Contact Center Agent Client
- Select the web browser of your choice. Please note that if you are going to use the CCAC as a softphone using WebRTC, you must use Google Chrome or Edge.
- In the URL, type in the Avaya Call Reporting server IP address followed by a colon, then the Apache Tomcat port (typically 9080 by default), forward slash ‘ccagent’. Example: 12.3.4.567:9080/ccagent
- Select if you are going to run in a desktop mode where the CCAC connects to your desk phone or WebRTC mode where your CCAC will act as your phone.
- If running in WebRTC mode, you must enter the phone password created in IP Office Manager User Settings.
- Ensure WebRTC mode is enabled within Avaya Call Reporting. This is found under System Settings > Voice Agent. Enable WebRTC and click “Save.”
In order to use WebRTC, you must first enable https for Avaya Call Reporting. To do so:
- Open Avaya Call Reporting
- Go to Admin (System) -> System Settings -> Basic Settings
- Click on the ellipses next to SSL Proxy Configuration
- Switch “SSL Proxy Enabled” to “True”
- Type in the Avaya Call Reporting Server IP address in the blank field
- Copy the “DNS Record”
- Hit “OK”
- Hit “Save.” This may take up to five minutes to go into effect.
- Once in effect, the “DNS Record” will be the new URL you will use to access the Contact Center Agent Client. Paste the “DNS Record” in the URL followed by “/ccagent”. Example: je9qt7cpdkathtuuqkdl.acr.ximasoftware.com/ccagent
- Hit enter, and you will now be taken to the Contact Center Agent Client.
Updated 3 months ago