Historical Call Data
After creating a Service User within the Chronicall UI, you will be given an authentication key. Anytime a request is made to the API, an authentication key must be present.
Add the following header to your API request:
Authorization : Bearer {authentication_key}By having the authorization key present, you will be able to access everything that the Service User is set up in Chronicall to have access to.
Note: For this feature, you must be updated to version 4.0.9 or newer.
Use Cases
- Periodically export historical call data into another application
- Programmatically generate report files in different formats to be consumed by another department or application
- Pull time card data from Chronicall into a staffing or payroll system
- Pull call records into a billing system (example: hospitality)
- Pull account summary usage data into a billing system (example: law firm billing by account code)
- To see an example, click here.
POST /rest/api/v1/historic-data/{historicDataKey}
An endpoint to run a report. Requires a json request body.
Arguments | |
|---|---|
|
|
{
   "format":"json",
   "parameters":[
      {
         "name":"Report Timeframe",
         "valueType":"REPORT_TIMEFRAME",
         "value":{
            "type":"REPORT_TIMEFRAME",
            "start":"2019-09-09T00:00:00.000-06:00",
            "end":"2019-09-10T23:59:59.000-06:00"
         }
      },
      {
         "name":"Rows (Agent)",
         "valueType":"PBX_USERS",
         "value":{
            "type":"PBX_USERS",
            "pbxUsers":[
               {
                  "key":"Agent1(200)"
               }
            ]
         }
      }
   ]
}
Response
If a successful request is made, then a report will be returned in the format that was requested. The following is an example of a JSON response.
{
    "reportId": 48,
    "executionId": "3eb08a9a-0f05-44b8-a0b0-ba7338a1d2e5",
    "title": "Agent Talking Summary",
    "timeframe": {
        "type": "REPORT_TIMEFRAME",
        "start": "2019-09-09T00:00:00-06:00",
        "end": "2019-09-10T23:59:59-06:00"
    },
    "skin": "Avaya Default",
    "columns": [
        {
            "key": "0",
            "title": "Agent",
            "format": "STRING"
        },
        {
            "key": "1",
            "title": "Inbound Calls",
            "format": "NUMBER"
        },
        {
            "key": "2",
            "title": "Outbound Calls",
            "format": "NUMBER"
        },
        {
            "key": "3",
            "title": "Internal Calls",
            "format": "NUMBER"
        },
        {
            "key": "4",
            "title": "Total Calls",
            "format": "NUMBER"
        },
        {
            "key": "5",
            "title": "Total Talking",
            "format": "DURATION"
        },
        {
            "key": "6",
            "title": "Avg Talking",
            "format": "DURATION"
        }
    ],
    "dataFlag": "INCLUDED",
    "summaryItems": [
        {
            "title": "Agents",
            "value": 1,
            "formattedValue": "1",
            "format": "NUMBER"
        },
        {
            "title": "Total Inbound Calls",
            "value": 4,
            "formattedValue": "4",
            "format": "NUMBER"
        },
        {
            "title": "Total Outbound Calls",
            "value": 6,
            "formattedValue": "6",
            "format": "NUMBER"
        },
        {
            "title": "Total Internal Calls",
            "value": 4,
            "formattedValue": "4",
            "format": "NUMBER"
        },
        {
            "title": "Total Calls",
            "value": 14,
            "formattedValue": "14",
            "format": "NUMBER"
        },
        {
            "title": "Avg Total Calls",
            "value": 14.0,
            "formattedValue": "14.0",
            "format": "NUMBER"
        },
        {
            "title": "Total Talking",
            "value": 12673424,
            "formattedValue": "3:31:13",
            "format": "NUMBER"
        },
        {
            "title": "Avg Talking",
            "value": 1810489,
            "formattedValue": "0:30:10",
            "format": "NUMBER"
        }
    ],
    "rows": [
        {
            "values": {
                "0": {
                    "value": "Agent1(200)"
                },
                "1": {
                    "value": 4,
                    "formattedValue": "4"
                },
                "2": {
                    "value": 6,
                    "formattedValue": "6"
                },
                "3": {
                    "value": 4,
                    "formattedValue": "4"
                },
                "4": {
                    "value": 14,
                    "formattedValue": "14"
                },
                "5": {
                    "value": 12673424,
                    "formattedValue": "3:31:13"
                },
                "6": {
                    "value": 1810489,
                    "formattedValue": "0:30:10"
                }
            }
        }
    ],
    "charts": {
        "type": "CHARTS",
        "rows": []
    }
}
Potential Errors
Status Code | Failure |
|---|---|
|
|
401 Unauthorized | The authorization header wasn’t valid. |
403 Forbidden\ | The authenticated user doesn’t have Chronicall access to view data for one or more of the requested agents or groups.\ |
Creating an API-Enabled Report
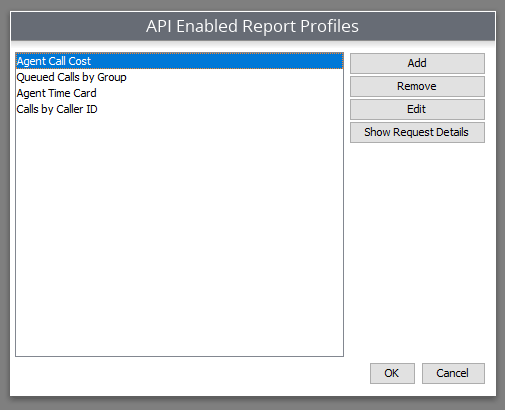
In order to make a request for a report, we’ll need to first enable it for API use. To do so, navigate to the Chronicall main page. On the left sidebar, select API Enablement > Historical Data Access. A pop up window will appear called "API Enabled Report." Click "Show List View," which is located in the bottom left corner. This will allow us to see all of the reports that are currently enabled for API use.

A new pop up window called "API Enabled Report Profiles" will appear. Select the report you would like to see request details for. If the report that you want to run does not exist, click the "Add" button, which is located in the top right corner of the window. Fill out the information that the "Add" window asks, which includes:
- Report Template: A searchable input that allows you to select any available report.
- Service Account: Select the service user that will have access to this report.
- Report UUID: The unique identifier for this report. This value will be used in the above URL as the historicDataKey.
Once the information has been entered, click "OK."

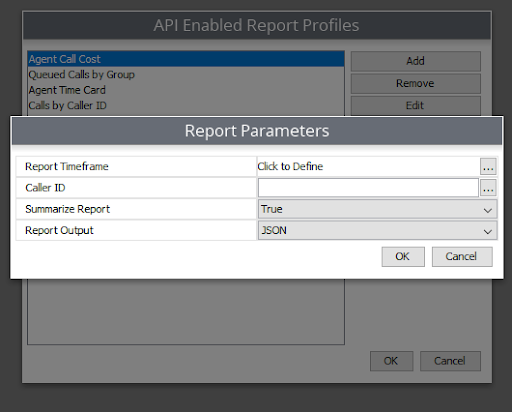
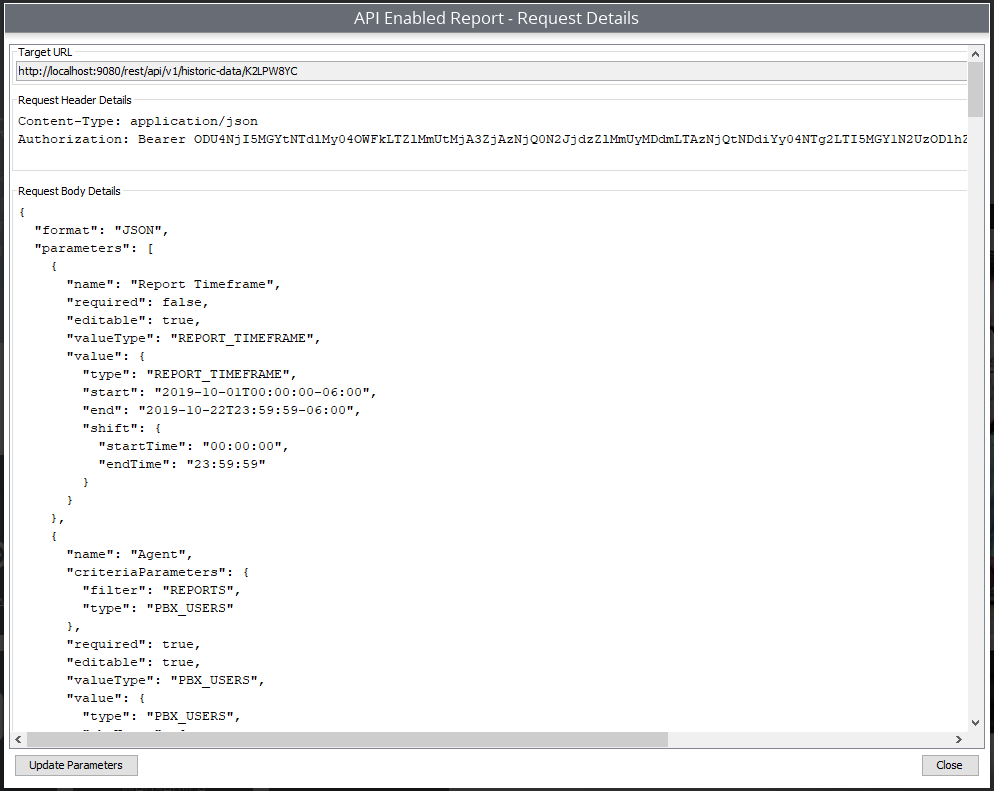
After you've added reports, you can view the "Request Details" for any report by clicking the "Show Request Details" button, which is located near the top right corner of the window. The Request Details view provides important information that is helpful when making API requests. When you click the button, you'll be prompted to select your report parameters, which will be used to generate details for your specific API request.

Click "OK" once all information has been entered. A new window will appear that provides you will all necessary information.

Updated 3 months ago